Making Your Front Door Unique! Tuscan Style
Submitted By: Creative Juices for Decor
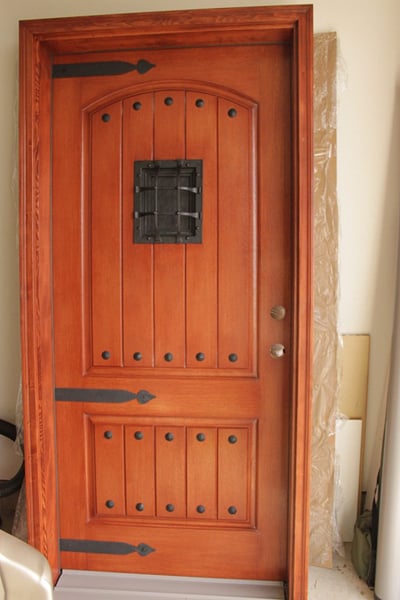
It all started when I ordered my front door. I really wanted to do an old wooden door that looked like I just brought it back from Europe but I was told that since my builders were an “Energy Star” contracted house I had to stick with an Energy Star insulated door (so no old wood door for me).
A few days after I placed the fiberglass door order we had a construction meeting and somehow Energy Star stuff and doors came up. Come to find out (don’t you just love finding stuff out a day late!) that you can choose up to ONE door not to be Energy Start to still qualify.
Well It was too late to change my special order so I decided to make the BEST with what I had ordered which was a fiberglass Energy Star door that looks like wood but really isn’t……(oh and for those who are wondering, I found out that only 75% of your lights have to be Energy Star, the rest can just be standard, at least I found that out in time…..)
So, what can you do to your front door to make it look like an worn old European door? First off let’s add clavoses and straps!

I know, you’re probably thinking what are clavos and straps (I was) but after some research I figured out that what you called those black knobs and iron dummy hinges. Searching “black round thingamabobs” on eBay was not helping me any.
I picked up 30 clavoses and 3 custom made straps (hinges) for $100.00 on eBay. I had to buy epoxy but that was only 5 bucks.
Now for the extremely scary part in which I can’t believe my husband trusted me with power tools, no less to do this on our expensive front door!!!!
I was so nervous and kept thinking what if I drill a huge hole through the entire door on accident or what if I pound in the clavos and it splits the fiberglass all the way down the center! IT… WAS…. SCARRRRY!
All to say, with a template and my mad skills 🙂 I was able to drill 28 HOLES into my new front door (without a disaster) and add all the extras.
To break it down a little, all I did was drill holes large enough that the pin part would fit, after all the holes were drilled I stuck epoxy around the backside of the iron and pounded it in. That part went fast, it was the drilling that took a while.
SO MUCH BETTER (or at least so much more of the look I wanted) But as I stood back I knew I wasn’t done yet. An old door doesn’t look “polished” it looks aged and dusty in all the corners and crevices…..
So I took out my bike chains and hammers and went to work on it.
Gotcha!
No I didn’t do that, although the thought DID pass through this crazy little head of mine.
I did add some latex paint mixed with a glaze (1:3) and filled in the crevices. I thought about mixing a stain with the glaze but since my glaze was water based and I couldn’t find a water based stain (they were all oil based) I thought I shouldn’t push my luck and try to put that on the door. I am not sure how long the paint will last on the exterior of the door but it only took me a few minutes to apply it so if in a year or two I need to add some more it’s no big deal. I may have the trim guy on my house put a clear top coat over the door for me, this will ensure the dark brown will be there permanently.


Now I really think I’m loving this door and I feel so proud that I turned a rather “standard” fiberglass door into a fairly European looking door like I really wanted. Isn’t that “speak easy” fun! It reminds me of the scene from Wizard of Oz where the munchkin opens the speak easy and says they can’t see the wizard, or the scene in Princess Bride where they go to the Dr. guy to get help….. (I’m not weird, I promise )


 |
| No, this isn’t MY home, just some inspiration! |
Cassity Kmetzsch started Remodelaholic after graduating from Utah State University with a degree in Interior Design. Remodelaholic is the place to share her love for knocking out walls, and building everything back up again to not only add function but beauty to her home. Together with her husband Justin, they have remodeled 6 homes and are working on a seventh. She is a mother of four amazing girls. Making a house a home is her favorite hobby.


What a great idea! I also had to settle for a fibreglass door instead of the cedar door I wanted. This is absolutely on my to do list in the spring. Awesome!
Good for you! It looks wonderful and the most important thing is, now you love it =) Merry Christmas.
i just had to write a comment about your fabulous door !
what a fantastic job !
ok , if you ever want to do add a tint or color to a water -based glaze (acrylic polymer binder)
just use pure powdered color & mix it in ..
any artists pigment will do ..
to make it dark in the corners & crevices or for a first time experiment use ‘burnt umber’ ..
cheap pigment , dries fast , a little goes a long way …
i just LOVE your door ! i just moved into a rental with the exact door you originally wanted …
& it has a tiny shutter that opens ..
great job !
Madamedummy, that is very cool advise! thank you so much!!!
I love your door and had the exact same idea and the same door. I scoured the internet for a speakeasy just like yours and could not find the one I wanted. I finally settled on just the grill for the front but it bothers me that it will be a fake speakeasy. Would you share where you got yours?
How did you install the speakeasy? Just cut a hole through the entire door? I had my painter start the staining process but he put on one coat and never returned. I figured I could do it myself, so I purchased two colors of gel stain. I recoated the whole door and then tried to put the darker color in the grooves for depth. It didn’t really take very well but did add just a little depth. I’ve already added a coat of polyurethane so can’t add more color but now I’m ready to add the clavos and was going to do it just as you suggested.
Greetings from Ohio! I’m bored to death at work so I decided to check out your site on my iphone during lunch break. I enjoy the knowledge you provide here and can’t wait to
take a look when I get home. I’m shocked at how quick your blog loaded on my cell phone .. I’m not even using WIFI, just 3G
.. Anyways, superb site!
That’s great to know that it loaded fast. Thanks for the comment.