How to Update Your Vertical Blinds!
I have a design dilemma. I have a bay window with a sliding glass door that leads to my back yard. When I moved in it was dressed with VERTICAL BLINDS. Yuk! I told my husband when we were house hunting that those would be the first thing to go. Well, that was three years ago and they are STILL THERE! Why didn’t I get rid of them right away? Well, it was a little more complicated then I imagined.
Because I was dealing with a bay window, I couldn’t hang regular drapes over the door without addressing the windows that flank it. I had to consider the bay as a whole and I ended up placing two panels of curtains flanking the bay itself. I was able to hang them about a foot above the actual window which added much needed height to that side of the room. I felt it was the best solution for the bay itself, but I still needed to cover the door for privacy reasons. Whatever I put in its place had to be fully and easily functional. Those doors are the only exit to the backyard and are used daily. Ideally I would have just used blinds or shutters but they just don’t work with a sliding door. I even considered making my husband rip the whole thing out and put in a pair of french doors, but that was cost prohibitive. So the vertical blinds stayed and I just lived with them because they were functional.
Well, my kids forced my hand. The other day they thought it would be fun to pull EVERY SINGLE vertical slat down and broke at least half! I had two choices, buy more vertical blinds (which I couldn’t bring myself to do) or finally come up with a good solution. Well, they say necessity is the mother of all invention and it hit me.
HANG CURTAINS ON THE EXISTING VERTICAL BLIND HARDWARE!

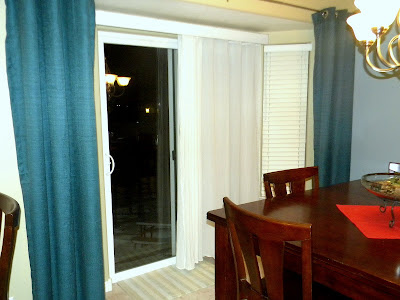
(sorry about the picture quality. I wanted to get a “before” image but it was the worse lighting imaginable. As you can see, the blinds were looking pretty sorry)
Here’s what I decided. White sheers were going in its place. White because I wanted them to relate to the other blinds in the bay and sheer so that I could have some light filtering through. The fabric was actually very tricky. I wanted something that allowed some light but they needed to still provide privacy so they couldn’t be too sheer. I also had to consider texture. I didn’t want it to end up looking like a sheet! I found a nice, white gauzy fabric (it also happen to be on sale for $2 a yard!) and I was set.
* Please note: I am a very beginner seamstress and a very lazy one. I only measure when absolutely necessary and will cut every corner possible. If I can do this,ANYONE can do this!
Here’s what you do. Measure the height and width of your door. Mine was seven feet high by five feet wide. You need to add extra width to give it some fullness so I added an extra three feet. (Remember to add a couple of extra inches for seam allowances) My fabric was four feet wide so I was going to have to piece two panels together. I placed the right sides together and did a simple zigzag stitch and then trimmed my fabric as close to the seam as possible. (Yes, I have a raw edge but it made the seam the least noticeable.) Then sew a simple hem on the two sides and the bottom. In order to hang my panel to the blind clips, I was going to add rings to the top. To reinforce where the rings would go I folded the top down about a inch and hemmed. (A) This made the area double thinkness. I then did a top stitch above where the rings would go to reinforce the top. (B) For the rings I got 3/8″ eyelets and a setter. I took the width of my panel and divided be the number of clips I had and determined I needed twenty one rings every five inches.(C) Follow the directions on the box and set the rings. I placed a cutting board beneath me to protect my counter but please consider the surface you are working on. DO NOT do this on top of a stone/tile counter or floor! You have to hit your setter with a hammer fairly hard and several times.

Once your rings are in place you can hang your curtain. I clipped each ring into the clips alternating the direction so that it made a wave. Thats it! It was so simple…


 This project was contributed by one of our fabulous readers! We love to share your projects with this great blogging community. So, if you have projects from kitchen renovation ideas to small bathroom remodels, overhauled and repurposed furniture, spray paint updates you name it please send it in! Thanks for reading Remodelaholic!
Cassity Kmetzsch started Remodelaholic after graduating from Utah State University with a degree in Interior Design. Remodelaholic is the place to share her love for knocking out walls, and building everything back up again to not only add function but beauty to her home. Together with her husband Justin, they have remodeled 6 homes and are working on a seventh. She is a mother of four amazing girls. Making a house a home is her favorite hobby.


My fabric/canvas vertical blinds just started falling apart at the bottom where the chains and weights go (the stitching to hold the weights in came undone) and the chains have been breaking since we moved in 7 YEARS AGO! This project is long overdue. Hubs and I were just debating what to do with the space. The wall is basically all glass from 7 ft to the floor, a slider with windows on either side. I am so glad I found this link so I have more options! Thank you!
Thank you so much for posting this. My husband and I just moved in to an apartment with vertical blinds in all the windows… yuck! I really didn’t want to put curtains over them for a number of reasons, they would stick far out from the wall plus we didn’t want to have money taken from our deposit because of holes in the walls. We plan to be here for several years while attending school and I was really stuck with what to do about it. Now I know what I can do! I’ve already got the grommets and setter on the way, now for the fabric. Thanks so much for the idea!
exactly what I was looking for… thank you~!
Just the right article I need just now. What a difference from those vertical blinds. Your drapes look beautiful and elegant.
Just wanted to let you know I completed my curtains over the weekend on 3 windows and a sliding glass door. Love it! What a creative and money saving idea! Thank you so much for your instructions.
Oh! I would LOVE to see pictures! either way i am so happy that you were able to use this tutorial! Congrats on a job well done!
Absolutely perfect. I been loathing these vertical blinds ever since the first one fell off (after only a month of moving in!). I have curtains thatI have not been able to hang, because I didn’t want to drill into the walls. This is great. Thank you for the instructions!
Not all blinds are ugly, and nice ones aren’t always expensive. We done some fantastic wooden blinds that are quite affordable. Though I do love your resourcefulness. Well done!
I loved your advise and was going to do the same when it hit me they have fabric shower curtains made the way you described . I just got a couple of them and put them up and avoided the extra work since im a single mom and I rarely have a spare moment I wanted to make the most out if it . its a little short but that’s ok for me just means the kids will not step on it. thanks for the tips I only spent about 20 dollars and transformed my kitchen with them
BRILLIANT!! Thank you for sharing!
We just bought a travel trailer and I just hated those vertical blinds that came with it. My solution was to purchase a fabric shower curtain and hang it there instead! No need to sew and perfect size!
Great solution, Diane! Thanks for sharing!
What a neat idea! I wouldn’t have thought of that. I had vertical blinds in our home too when I first moved in and they were falling apart. I found this guide by Chicology on how to fix it, and then I ended up getting the more modern vertical blinds version for our sliding door and bay window upstairs.
If you want to upgrade again, you should look into the kinds they mention: https://www.chicology.com/blog/2018/10/16/how-to-fix-broken-vertical-blinds-a-guide-for-the-not-so-handyman/