Fishbone Chair Project Plans and Tutorial

Upcycle us is what comes to my mind when I look at the full recycling bins before trash pick up.
Upcycle us is also a blog featuring upcycled items from the same trash pick up. The items you will see are highly influenced by designers who use minimalist designs and concepts, such as making an Ipad holder from chopsticks or a chair and trunks from shipping pallets. Because upcycling is a long process, Upcycle us also features projects made by others.
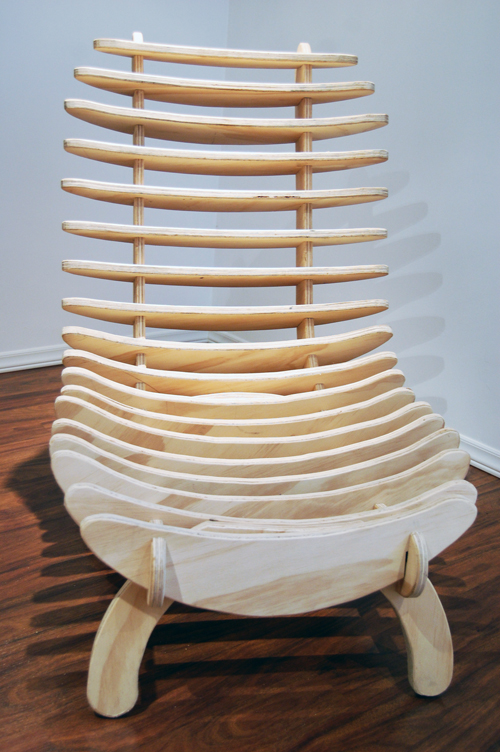
The fishbone chair is the most sophisticated project of my blog in terms of work and design and it’s using a bit more than one 4X8 piece of plywood. I salvaged this wood after finishing my basement.
So far and as I said: “It is totally inspired from the creation of the designer Nicolas Marzouanlian that cost around $1600. The chair is so creative and simple (and because I can not afford to spend this amount of money on such a beautiful hand-made chair), I decided to give it a try and made my own.”
How to make it:
The main hurdle was to make the chair from a single picture available online. When I first saw the picture, I liked it so much that I started making the chair the day after. This chair does not need nail or screws not even glue, the assembly is based on the same principle as the 3D wood kit puzzle that creates dinosaur skeletons.
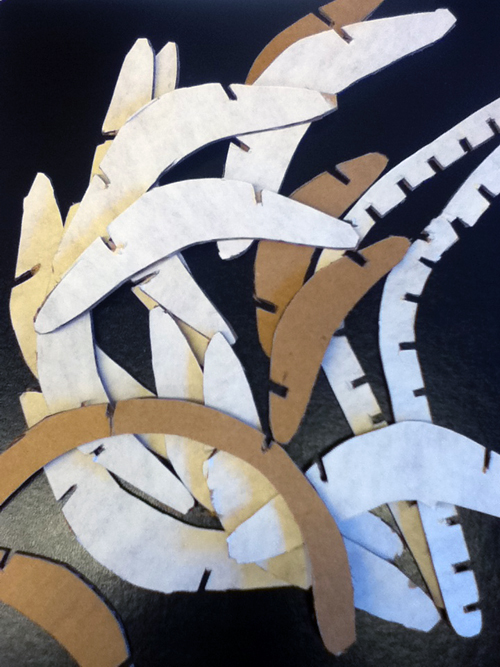
First, I made a miniature out of cardboard, it helped me to realize practical details such as making notches really accurately and at a precise distance from each other, because wood won’t stretch as easily as cardboard.
I had to decide the shape and size of the 3 main components: the croissant shape, the spine and the legs.
This is the shape and size of all the pieces needed :
“The croissant shape”:
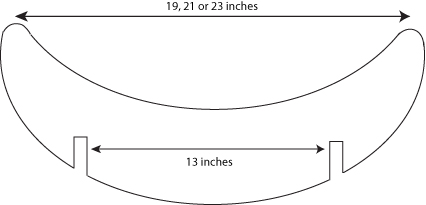
14 croissants will be 23 inches wide, 2 of them will be 21 inches and 2 will be 19 inches (the first and the last). A total of 18 croissant shapes.
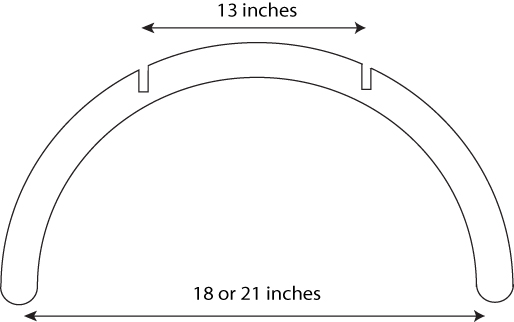
“The Spine”:

The legs:
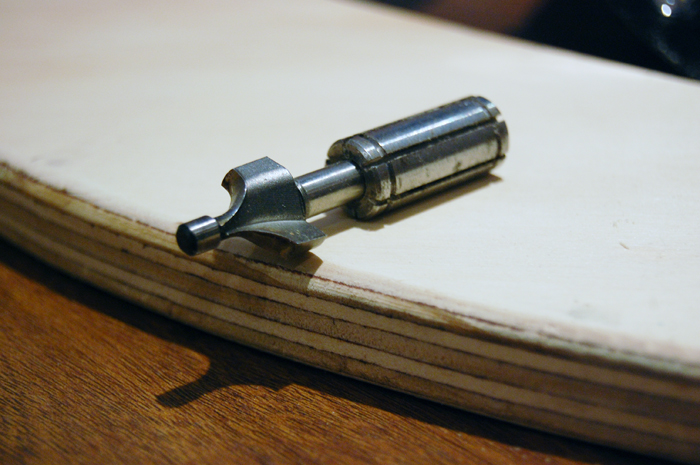
To cut all the shapes you’ll need a little bit more than one 4X8 3/4 inches plywood. For the cutting, I used a jigsaw with a blade that cut precisely and does not damage the plywood (Precision Cut from Bosh are pretty good).

An optional step is to smooth all the edges using either sand paper or for the lazy one, a router. Even if it’s optional, it’s highly recommended.
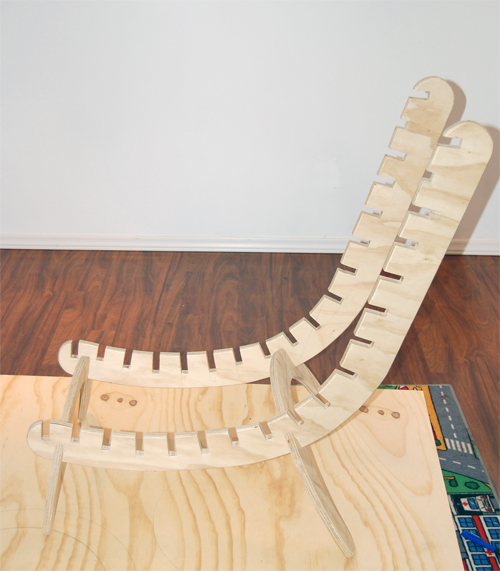
Once the cutting is done, this is what you should get. A chair that is much comfortable that it looks, my friends are always surprise to see how sturdy and comfy this chair can be. Space between each croissant is 2.5 inches, you could also reduce this space to 2 inches to improve the seating experience but it involves making more shapes and the design might be affected too. If you give it a try, we’d like to see it!


 This project was contributed by one of our fabulous readers! We love to share your projects with this great blogging community. So, if you have projects from kitchen renovation ideas to small bathroom remodels, overhauled and repurposed furniture, spray paint updates you name it please send it in! Thanks for reading Remodelaholic!
Cassity Kmetzsch started Remodelaholic after graduating from Utah State University with a degree in Interior Design. Remodelaholic is the place to share her love for knocking out walls, and building everything back up again to not only add function but beauty to her home. Together with her husband Justin, they have remodeled 6 homes and are working on a seventh. She is a mother of four amazing girls. Making a house a home is her favorite hobby.


Nice job!
Since you mentioned more croissants might be nice, the original has 19 and looks shorter.
A good tip is to exaggerate the swooshes. The sides come up really high and the arch of the chair is more erect on the pro one.
Hi Frank please can you help me with any plans, sizes,or any other information with regards to me attempting to build one of these chairs
Thanks in advance
Geo..
These plans are worse than useless because there are no detailed plans
Love this chair, i’m in the middle of assembling it now. My drawing skills are really sub-par so I hope for the best. Thanks so much for posting this. I do have one question as mine is a bit more straight backed than I would have hoped. Do you have a better measurement for the frame? How far from the 30 inch measurement does the back extend? The notches in the frame were the most time consuming part thus far, but maybe for the next one : ). Thanks again.
Amber, I think that is awesome that you are making that chair. It will be best to ask your question directly to the author at Upcycle Us. Great question though. I hope they can help!
I took a stab at making my own ,and posted the details at instructables. Thanks for the inspiration!
Hi your chair looks fab can you give me any sizes to work to so I can try
Regards
First of all, what a great idea and inspiration. You do beautiful work.
I looked your site over from top to bottom and cannot find the patterns. Can you please send me the patterns?
Hi wade I’m looking for any plans you may have for the fishbone chair I am from scotland and cannot find any info anywhere
Best Regards
Geo
Do you have any patterns you could send me?
this project did not include scale of each notches..is anyone have a measurement of the notches?
any measurement the length of each notches?
Hello
As this is May 2017, I have seen this chair roughly a half a year ago. Now, I am slowly in the final steps to go ahead and begin cutting my plywood. If by any chance, you might have any dimensions, This would be great. If not, I am hoping for the best. Once complete, with or without any minor dimensions, I will send you my final result. Hope to be done by mid to late summer 2017.