DIY Concrete Kitchen Island Reveal + How-To
This gorgeous modern kitchen island has a DIY concrete Kitchen Counter tutorial for you to try your hand at.
If you like this post you might also like these 27 kitchen island ideas, this glossy painted kitchen counter top tutorial or this beautiful copper kitchen countertop tutorial.

Hello! My name is Karisa and I blog over at Petite Modern Life. I’m so excited to announce I’ll be joining the Remodelaholic contributor team for 2015! You can count on me to share fantastic home remodeling, decorating and inspiration projects with you here on this fabulous blog!
We dove into remodeling our 1970 rambler one year ago and it has come an incredible ways from its standardized everything, awkward pocket doors, oatmeal walls + carpets, and even screenless single pained metal windows. Today we’ll focus on the kitchen transformation and our DIY concrete island! First I’ll need to speed you through what it took to even get an island in our kitchen. It was serious business! Here’s what the kitchen looked like for the previous owners.


The kitchen was enclosed and cave like. Not at all what I pictured in my “dream home.” How do you make this into an open kitchen? With a hammer, crowbar, and a little bit of love of course.

Look at all the light crossing through! It was a glorious moment. AND the roof didn’t cave in. Ok, we did do some heavy homework about trusses and support and had a structural engineer friend on hand to talk with. After all the walls were out of the way we rearranged the cabinets to make the most of the storage space. The tall pantry cabinet could only open at a certain height, so we raised all the cabinets with wood inserts and shims to be level with it. We talked about adding awesome drawers underneath, but sometimes there’s such a thing as “one project too many,” so we didn’t pursue that route.

You can see that we also tore out all the floors and carpets at this time. We lived on plywood for a good few months while we chose and ordered new floors, which we LOVE! I hope to share those here another time! Once those and the new baseboards were all put in we had formed our plan for the island. We decided to do a faux concrete island with a waterfall end. Below I’ll give you the step by step of how we made the counter.
DIY Concrete Kitchen Island How-To
Full Material List for the Counter:
- 3 Sheets of plywood that measured 2.25″ thick total (~$150)
- 2 Bags Ardex Concrete Feather Finish (~$63)
- Metal trowels: 10″, 3″, and an extra 3″
- Medium mixing bucket (at least 60 oz)
- A mixer attachment for your drill
- Measured mason jar
- Painters Tape
- Rags
- 400, 220, 180 Grit sandpaper
- Power sander
- Shop-Vac
- GST International Satin Sealer & GST International Final Coat (~$80)
- High density roller brushes large and small
- Stain Brush
- Paint Pan
OK, let’s begin. First we drove over to Lowes with our counter measurements, including how much overhang we wanted for the bar. We purchased 3 slabs of plywood that measured 2.25″ thick and screwed them down. The first piece was drilled into the perimeter of the cabinets and the other two heavily into one another. We filled the holes with wood filler, let dry then sanded even. You don’t need to sand all the plywood before applying the concrete because the Ardex Feather Finish needs a roughed up surface to adhere properly. Next tape off your cabinets and wherever else you don’t want concrete to stick. (*Note: some of the tape will be forever concreted in, but you can use an x-acto knife to cut off the remaining no big deal.)

Now you are ready for the concrete finish! This is our second go around using Ardex Feather Finish. Our first project was our bathroom counters and we learned quite a few things from that experience which I’ll tie into the instructions below.
- MIX your concrete thin. Much thinner than the recommendations. We determined that 32 oz of mix to 20 oz of concrete powder was easiest to smooth across the surface, it didn’t dry in the bucket too fast, and was easier to sand in between coats. Use your drill mixer attachment to whip the two elements together; let sit for 5 minutes; then stir again with your trowel.
- SPREAD the concrete in big splats across your largest surface using your largest trowel. Spread thin until completely covered. Then, using your smaller trowel, cover your side and underneath surfaces. Have a compadre follow you around to wipe up the concrete that falls on the ground.
- CLEAN your tools an buckets outside in between coats to save money!
- EDGE the concrete after it has sat for 30 minutes with your small trowel. We wanted our island to have sharp angles so we pulled the small trowel around all the edges until they were crisp.
- SAND down the large surface with 400 grit on a power sander after dry (this time will vary depending on your home’s temp and humidity. We generally waited at least 12 hours). Be careful to not use your power sander near the edges, or you risk nicking the concrete back to wood. Instead, use a sanding block to smooth out the small surfaces. (*TIP: Did you know you can hook up your shop vac to your power sander?! Sanding inside was no problem when we were doing that!)
- Repeat the above processes 2-3 times. More is OK if you sanded too much or something random happened. It can be a delicate process. Change to a lower grit sandpaper with each repeat, with your last coat being sanded with the 180 grit. Let dry completely.
- TIP: We did our very last coat in 3 parts so there weren’t random smears of concrete that dried at different times on the edges. We did the top and waterfall surface first, scraping off any concrete that got on the sides. Let that dry about 2 hours. Then do the undersides scraping off any that gets on the sides. Let dry to another 2 hours. Lastly do the edges scraping off any that get on the top and waterfall side. Let fully dry then sand. This may seem OCD, but we really think it helped the island look like legitimate slabs of concrete.

The last step is sealing. We wanted to use a different sealer than our bathroom and after researching some online we decided to go with the GST International Satin Sealer (oil + water resistant, long lasting, resealable) for the first coat and the GST International Final Coat (scuff resistant, long lasting, high gloss). We got ours through a local dealer. (*Note: It can take more than 3 weeks to receive these from their only online store!) The staining was very easy and very fast. Apply the satin sealer very quickly with a high density foam roller. It dries in less than 10 minutes and you want even coverage so be agile! We did 2 coats of the satin sealer followed by 4 coats of the final coat. All in one day. Let cure ideally for 4 days. (We had a huge party at 3 days and while we tried to hide our anxiety over the situation, the concrete really held up great!)

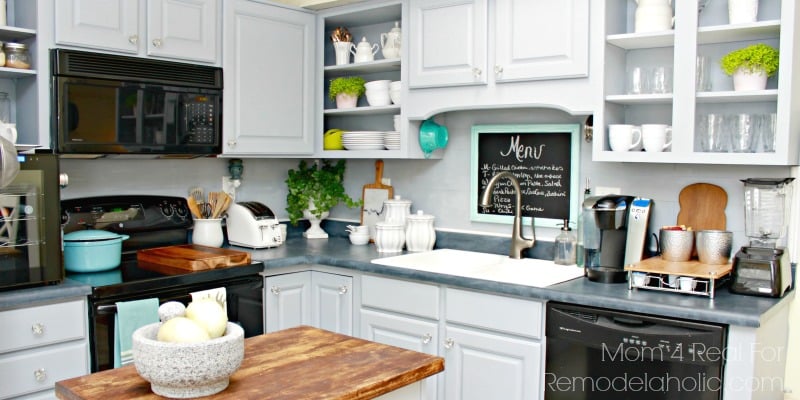
Would you look at that gloss!? It was just what we wanted while keeping the concrete its original gray color. Now then, so you don’t have to scroll up, here’s the before..
And the after!

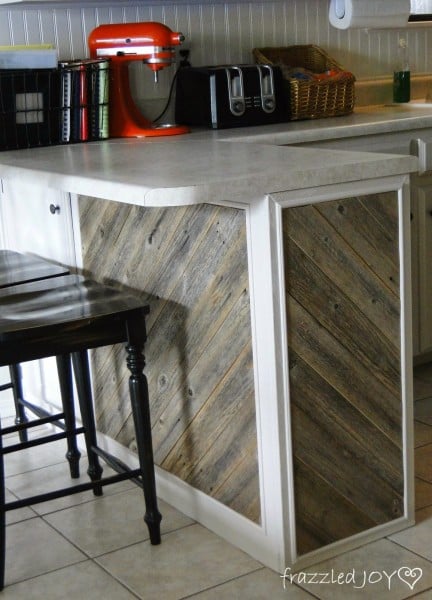
What do you think of the wood? They are 1x6x8 Douglas Fir Boards cut and mountedto the cabinets with a nail gun. We used dark walnut stain, the same that is on our shelves, but with two coats instead of one for a richer color. (7 Planks ~$130)

The waterfall look is my favorite part! I’m so glad we did it. You can see the unique colorations the concrete has in this picture. They add that perfect industrial look that I love.

We found these stools on amazon.

The concrete crisp edges add a great contrast to the other rounded decor in our house while still flowing with my favorite industrial pieces.

Summary of time and costs: The total cost for your island project will depend on its size and what materials you have on hand. Our total cost was more or less than $450. This project could be completed in 3-4 days.
Thank you for reading about our DIY concrete island! I hope the (in depth) tutorial can help you create something similar in your own home! My husband and I will be updating how it’s holding up over the next year so check our blog for the quarterly updates!
Also, I’m so very thrilled to connect with you here on Remodelaholic! I hope you stick around and check out more amazing things happening on this blog by Cassity and the other contributors!
If you enjoyed this post you’ll love my tutorial for Heavy Duty Floating Shelves, our DIY Painted Shower Tiles, and this DIY $35 Modern Pendant Light. Stop by sometime and say hello! I’ll answer any questions below so ask away. Cheers friends!


 ————————–
So thrilled to have you on our team, Karisa, and love what you are doing in your home!
More kitchen island ideas here:
Black Beadboard Panels and Corbels


I’m currently doing the same type of concrete counters and am using the same GST products. Did you roll on both the satin seal and the final coat in the same fashion? The final coat has instructions about using microfiber pads, I just wanted to see how you went about it!
Beautiful kitchen!!
I will be doing the same type of remodel on our kitchen and my husband is IN LOVE wit hthe waterfall counter idea. Could I get more detail on how you did that??
Thank you!!