Staining A Deck
Well, we have a new house. I know, it still feels a little weird to me too.
We have a TON of work to do. I think we might move in by 2017 at the soonest… or at least that is what it feels like!
I would REALLY love to have you follow along with the day to day stuff. The best way to see progress is to follow me on instagram! I try to show what we are doing there as often as I can. The hashtag for the house is #birchhouseremodel, so you can look that way too.
If you follow me on instagram you will know that we have been building a deck. It seems a little strange (even to me) that we bought a huge fixer upper and haven’t even touched the inside of the house, but instead got right to work building a deck. Well, it feels strange, until you see that we bought a little slice of the garden of Eden, in Utah (a desert- just for reference) and I just want to spend as much time in the backyard as possible. And the weather has been insanely comfortable and beautiful! I LOVE a good summer rainstorm…(except when I am am staining a deck… that is annoying, don’t ask me how I know. I just do.)
Anyway, I am not going to tell you how to build a deck since that is a LITTLE, a lottle TOO intense, and you need a good foundation in building to really understand. Instead, I am going to share some tips on how we stained our deck, which I think any person with an outdoor deck can use and maybe in another post I will give you some tips that helped us with the details on building our deck.
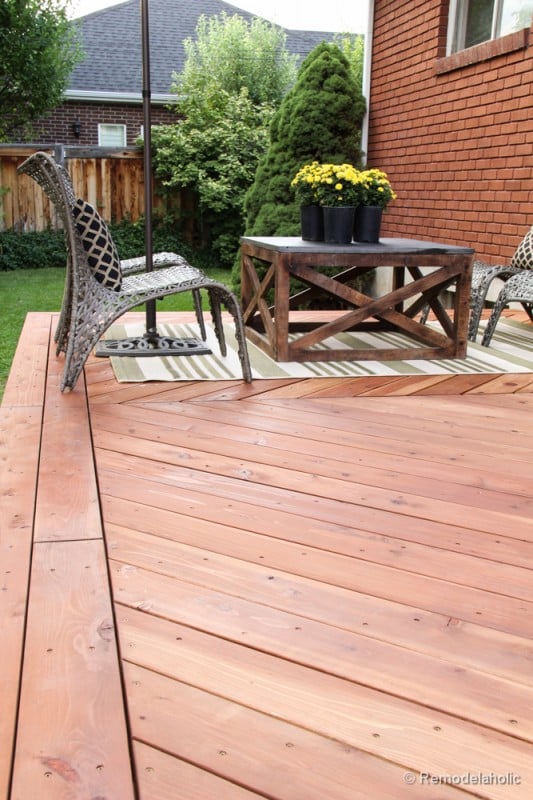
We built our deck in 4 large diagonal sections. The deck itself is 360 square feet, so it is pretty big. The one downfall is that we just happened to build it in a week of huge summer rain showers which caused us a TON of headache I can tell you that! (but I will explain more in a second) let’s get down to the the tips.
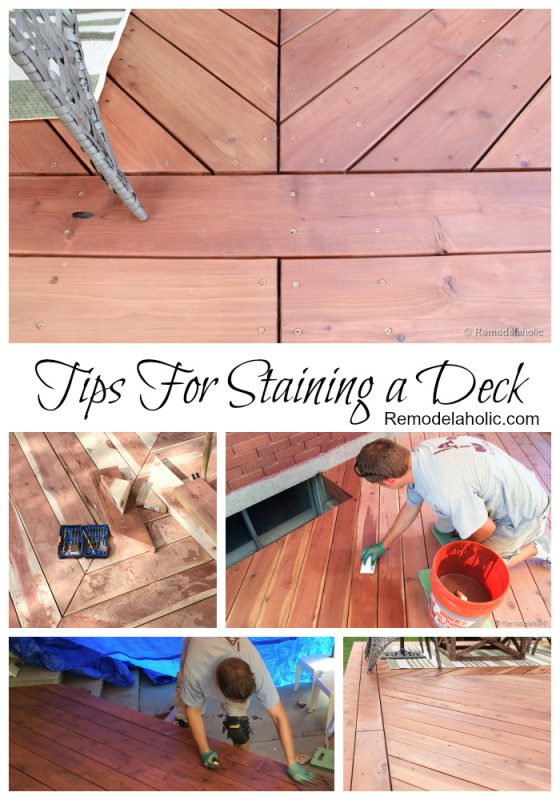
Tips For Staining a Deck
1. Decide what product you want.
We are so happy with how our deck looks! We chose to work with Thompsons’s Waterseal. Thompson’s has tons of choices, from clear, to transparent, to solid. We chose the transparent stain in Acorn Brown, for three years of protection. We wanted the variations in the wood to still show through, but we also wanted protection from the elements so, for us this was the perfect choice. Did I mention it goes on in ONE COAT! A happy dance just happened! Not to mention, the color just happens to work perfectly with our brick.
2. Collect your supplies!
Great Tools to have:
Thompson’s Waterseal
Stain applicators like Shur-Line 1791257 Deck Stain Pad with Groove Tool![]() , we also found some small, disposable, hand-held versions at Home Depot. They were my favorite since I had so much more control.
, we also found some small, disposable, hand-held versions at Home Depot. They were my favorite since I had so much more control.
Disposable Flat, Foam Material Brush in 3 in Width
Tooluxe 6-in-1 Painter’s Tool – Stainless Steel with Soft-Grip – Hammer End![]()
Several old rags/ towels
Large 5 gallon Bucket
Waterproof Gloves (disposable if desired)
REALLY comfortable knee pads, XtremepowerUS Professional Super Comfort Gel-Filled Protective Knee Pads![]() . These are just like the ones we have. I have never loved a knew pad SO MUCH!
. These are just like the ones we have. I have never loved a knew pad SO MUCH!
Surface to put tools when not using, i.e a cardboard box or a solid piece of Cardboard.
A cut up cardboard box, for protecting your house…
3. Watch out for staining from the elements while you build!!
So, sad story:
We built our deck in between HUGE rain storms and lots of HOT summer sun. By the time we finished putting the surface wood on, half of the wood had discolored from the sun and there were HUGE water stain marks (see below)… We tried to protect it from the elements with tarps while we built it but we did it too late. So we had to majorly sand the deck before we could stain.
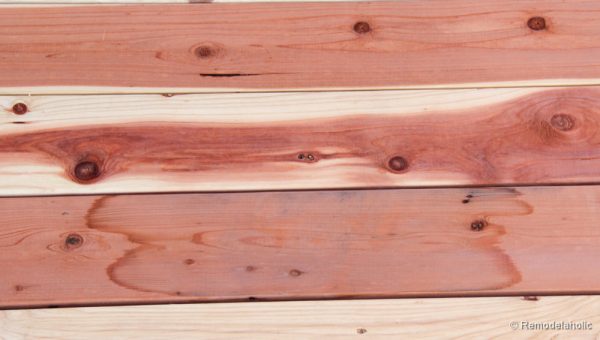
We scrubbed the water stains and that helped a bit, then we had to sand the rest off with 100 – 120 grit sandpaper. This exposed fresh wood, which made the deck surface a dramatically different color from the wood that had been there 3 or 4 days in the elements. In order for the whole surface to stain evenly, we ended up sanding the WHOLE brand new deck.
The good news about the sanding is that we were able to get any rough wood edges cleaned up to avoid splinters for bare feet. Our wood is literally silky smooth. So, truth be told, even with as much added work as this step caused, I am not sure I would skip this sanding step, because the deck is SO nice after doing it. BUT I will just not let the wood get to the point where we had to REALLY sand down a lot of the wood just to get it looking nice. Rather, I will sand lightly and stain the sections as we finish building them, to protect the wood from the elements sooner!
4. Make sure the wood surface is clean and free of debris before staining.
After we sanded we had a TON of dust on our boards and in every single screw hole. We swept and used our compressor to blow the dust out of every nook and cranny to make sure there was not a spec of dust on our deck. And we literally took a good 20 minutes for each section to get it spotless so we could move on to staining!
5. Use a Pop up Shade Structure!
You do not want to apply your stain in full sun, or the stain will dry faster than you can wipe away the excess making the finish look very uneven and basically like a hodgepodge. Make sure to create some shade if there is direct sunlight hitting the surface you are working on. An added bonus, it makes the work much more pleasant for you!
6. Pre-mix Your Stain
The gallon we used covered approx 400 square feet the color is premixed, so I just had to grab it off the shelf and go. Since we built a large deck, needed a second gallon. To make sure the finish was uniform, using a large 5 gallon bucket we poured both containers in there and mixed. This helped to ensure that we would have an even color on the deck if/when we had to break into the next gallon of stain.
**We actually just left the stain in the large bucket for the duration of stain application. It took us about 3 days to stain the 4 different sections. Instead of trying to put it back in the original container every time, we just covered it in the bucket. To cover it, we used a plastic grocery bag, I carefully placed the bag directly on the stain surface in the bucket, gently pressing the bag to the liquid surface, but don’t push it down hard or it will sink. Then with another grocery bag, I covered the top of the bucket. It worked like a charm and kept the stain from drying out between coats. Every time I started a new section I just pulled out the plastic bag and actually wiped it onto my first board or two, so I didn’t waste the stain. Put the bag on your grass to dry and throw it away when it is dry.
Once we were all done with the deck staining, we just poured the left over stain back into one of the gallon containers it came in. Ready for touch ups and future projects!
7. Stain one board at a time
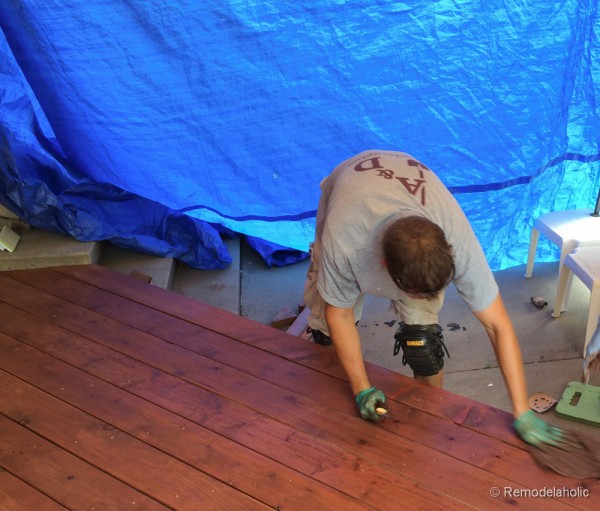
I mean the entire board, from cut end to cut end. Stopping in the middle of the board, can be done, but you are more likely to have uneven staining. I found that staining the WHOLE board, where possible, made a huge improvement to the look of my finished board. This is where having REALLY good knee pads becomes totally necessary so you can move quickly along the board.
Working fast, apply a generous coat of stain to one long board. Using a rag lightly wipe off the excess (but not thoroughly at this point) Now, using your foam brush, smooth the stain in the cracks of the boards. This way, there isn’t a bead of stained wood and then raw wood in the cracks. You want to work the stain into the cracks evenly. Now quickly take a larger, dryer rag (I literally used an old cotton hand towel, it worked perfectly) Remove all the excess of the stain. Be sure to remove any excess stain on the adjoining boards…
ALSO- Be sure to wipe in the direction of the grain, and remove any excess stain quickly in one long wipe, working with the length of the board. I missed some stain on a board because I didn’t wipe it with the second dryer rag and the stain is really uneven. Totally my bad, it probably didn’t help that we were doing it in the dark because rain was coming! Just be sure to look over the last two boards before moving on to the next. Every. Single. Time.
p.s. Where the boards were smaller and more manageable I stained two to three boards at a time. However, you must be able to manage them all without them over drying. This may mean that technically, I wasted a little of the stain, on the first wipe of excess removal but the finish on my deck is perfect so it was worth the extra stain, and it didn’t add substantially to the cost. It is much better to do it right the first time, in my opinion!
p.p.s. You can DEFINITELY use a staining pad that attaches at the end of a broom handle to help avoid bending over while you are applying the stain.
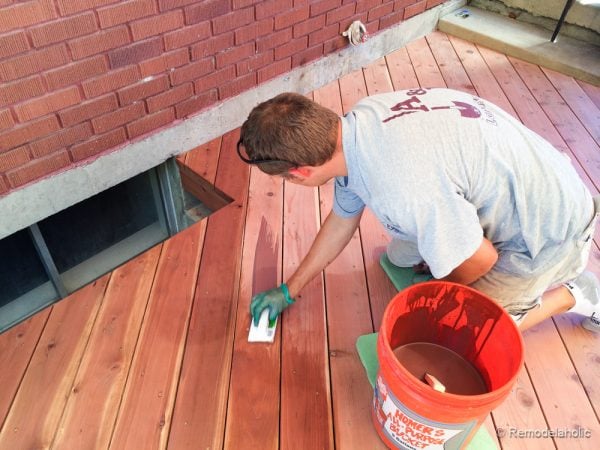
8. Staining the cracks:
While you are staining and not after the fact, take care of the cracks between boards immediately. Or it will look really sad! It can be done a couple different ways.
This fun attachment has a tool that works it’s way through the cracks of your deck! So cool (if the cracks are big enough~)
For small cracks you can use your first “wiping” rag and a 6 in 1 painters tool to drive the rag into the crack and drag it through the crack for the length of the board.
For larger cracks (and what I liked personally the most) you can use a 3″long disposable foam brush. Dip it lightly in stain (or collect some of the excess stain from the top of the boards you are currently staining, and drag it through the crack between the boards, be sure to wipe both boards when you finish the cracks!
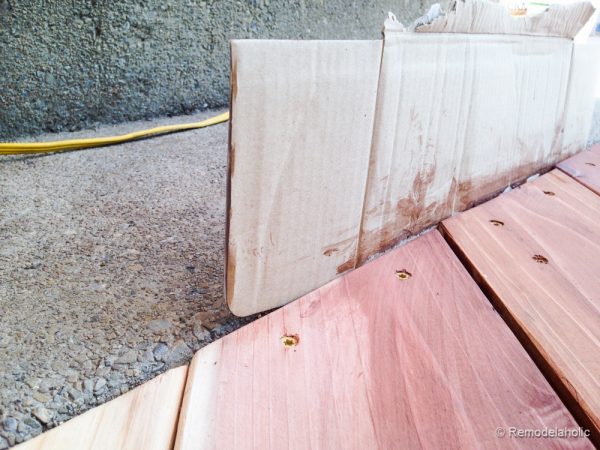
9. Protect your siding or foundation
If you are staining up against your house, be sure to protect the surface. You don’t have to spend any money to do this. I used a random cardboard box, Ripped it into sections and wedged them between the house! Worked like a charm! Just recycle or throw away when done.
10. Protect your skin:
Wear good disposable gloves and pants if you can stand it! I got stain on my leg 4 days ago… it is still there! I didn’t wash it off in time, now I have a fake tan gone wrong… However, if you wash it off right away with soap, water and a good scrub it comes off easily… when I remembered to do it.
I really hope these tips help you out! We learned a lot over the three days we stained our deck! I loved that Thompson’s was one easy coat and done. I really don’t think I would have the energy to do anything more after all the building! But these results are worth the work:
Want to see how this stain held up? Check it out here.
* Thanks to Thompson’s Waterseal for sponsoring this project!
Cassity Kmetzsch started Remodelaholic after graduating from Utah State University with a degree in Interior Design. Remodelaholic is the place to share her love for knocking out walls, and building everything back up again to not only add function but beauty to her home. Together with her husband Justin, they have remodeled 6 homes and are working on a seventh. She is a mother of four amazing girls. Making a house a home is her favorite hobby.


Wow, that looks like a lot of work! The results are fabulous though.
that’s so exciting cassity! love the name birch house, and can’t wait to see more!
Nail polish remover and a cotton ball will help with the stains on your skin. I splattered some on my bare feet and got some on my hands. Acetone took it off in a jiffy.
I am working on my deck over the weekend, so thank for the tips on prepping the deck that is very helpful.
We used a pad to do the staining similar to what you used (with the little crack too). We put a handle on it though so we could stand and do it. Looks like yours came out great!