Cane Back Dining Chair Makeover
If you’re looking for a great weekend project — pick up an old chair and get started! You can have a new stylish seat in your house for just the cost of some paint and a bit of fabric — and maybe a little bit of hardware, like the nailhead trim that Roxanne used on this cane back dining chair makeover:

You can make over just about any kind of chair (like these here) — although some are bit more than a weekend project. Keep it simple and start with a dining chair
(click on any of the links below the photos to see the tutorials)


or a folding chair


and then you can put your new skills to work on an armchair


or even reupholstering a chair!


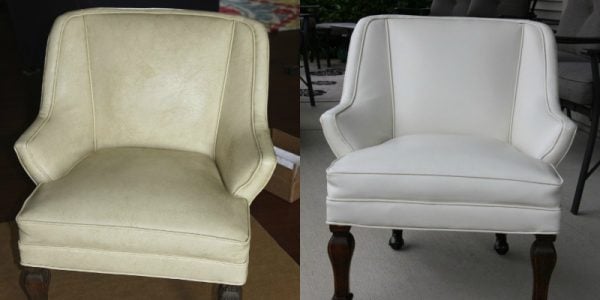
and leather? No problem!
Here’s Roxanne to share her chair makeover with you:

How to Paint and Redo a Curbside Cane Back Chair
by Roxanne from The Honeycomb Home
Hello Remodelaholic’s! I’m Roxanne from TheHoneycombHome.com blog, and I’m excited to be guest posting here today! I am slowly upgrading my small, builder- grade home on a budget, one DIY project at a time.
Have you ever picked something up curbside? One day last fall, I was out driving and I saw this chair on the side of the road. I thought about picking it up and refinishing it but I wasn’t sure if I should. I turned around and passed by it again to get a better look. Then I decided I was going for it, so I circled around again. It is kind of embarrassing to me to take stuff from somebody’s garbage, but I couldn’t pass this one up.

Another reason I hesitated is because years ago I convinced my husband to pick up a cute picnic table and benches we saw curbside. It was a round table with the four rounded benches. After we got it home we realized it was loaded with termites. John was not amused. So I brought this chair home anyway, much to John’s horror. He put it in the shed because he didn’t want it in the house. Then it proceeded to snow every other day all winter so I couldn’t get back to the shed to get it out.
Now that the snow is finally gone, I was able to get to work on this makeover. I brought it in and removed the seat by unscrewing it from underneath.


Once that was off, I started with paint. I needed to get rid of that pink asap! The chair had been spray painted a glossy salmon pink color that I was worried would be hard to cover. Notice in the before they even spray painted it with the existing cushion on! So I decided to try Annie Sloan chalk paint again. You can read about my first experience with chalk paint here. I had a sample pot of the Paris Gray.

Because I only had a sample pot, I did only 2 coats of paint before I ran out. As it turns out, that was enough to cover the pink nightmare completely. While the paint was drying, I removed the old fabric from the cushion by pulling out the staples with a flat head screwdriver. Somebody obviously refinished this chair once before.

Now here is the part of the project where I got so involved I forgot to take pictures. Once I had the old fabric off, I recovered it with a bit of fabric I had leftover from my No-Sew Curtains that I made for my family room. It was really close to not being wide enough, but I stretched it very taut and it was just enough to work. I secured the fabric on there with my staple gun. Then I remembered I had some nail head trim leftover from a headboard I made. The headboard was from my pre-blogging days, but you can see the tutorial I used here. I attached the nail heads and hammered them in with a rubber mallet.

Then I generously covered all the gray painted areas with the Annie Sloan wax to seal the paint. I didn’t distress this piece because I didn’t want the pink showing through EVER. The chalk paint is a little pricey, but now that I’ve used it a few times, I can see why. Totally worth it! I did not sand this chair before painting it at all, and only two coats completely covered it.

Pretty dramatic difference, isn’t it? Not bad for a curbside chair and using only supplies I already had from other projects.

————————————–
Thanks Roxanne! Remodelaholics, see more from Roxanne over at The Honeycomb Home — her home is beautiful and you’ll love projects like her pegboard spice rack and closet door makeover.
 |
 |
Want to be featured? Link up here and submit your best project here.
See more chair makeovers here:

Lorene has been behind the scenes here at Remodelaholic for more than a decade! She believes that planning projects and actually completing them are two different hobbies, but that doesn't stop her from planning at least a dozen projects at any given time. She spends her free time creating memories with her husband and 5 kids, traveling as far as she can afford, and partaking of books in any form available.

I redid my cane back chairs a couple of weeks ago and love them! Mine weren’t curbside, but at $150 for 4 (2 were arm chairs) I was pretty happy. 🙂
Cassity, thanks for sharing my curbside chair makeover!
Thank you so much for sharing it with us, Roxanne!
SO pretty!! I’m definitely inspired. I have four of these chairs waiting to be redone!
Two years later – did the paint stay put on the cane back? I have the exact chairs and I’m concerned that sitting on them, the movement of the cane would cause the paint to crack or chip. Thanks, beautiful job!