Yo Cabbie, finally…, Upstairs Bath Remodel; Part 6
Other posts in this remodel:
Wet your Appetite, Part 1
Got Paint, Part 2
Tile with Style, Part 3
For Vanity’s Sake, Part 4
Mirror Mirror, Part 5
This post has taken a long time in coming. Building the cabinet took a week or two longer than expected. Then it was Thanksgiving, and I wasn’t in the mood to paint… for 4 weeks, and when I finally got the energy to do it Christmas was here. (Should I think of any more excuses? I think not! Honestly, I hate excuses!)
The truth of the matter is, we take a long time on projects. I have learned from this remodeling project that I need to have the project completely done before I am allowed to start posting about it.
It is just too easy for me to live in an unfinished house. It doesn’t even faze me! For example, there was a time in college, where we didn’t have carpet over the sub-floor in our hall for three and half years. I had to wear shoes in that house, big deal.
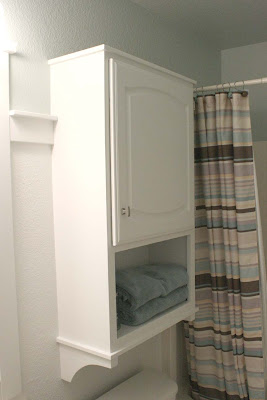
Anyway, one of the whole reasons for this little bath remodel was that I wanted a cabinet above the toilet. This way, cleaning products will be in a safer location, and there will be more room for toiletries. Especially since we have no drawers in our tiny vanity.
Also, we had done this in the past. Which is another reason, I wanted it, I missed the space that it created.
**FYI** When we did this before, we just modified one of those over the commode cabinets that has legs.. you know what I am talking about right (picture below)? Well, we just attached it to the studs with good heavy duty screws and never installed the legs, when putting it together (such an easy customization/fix to those sorta silly looking things!). Here is a picture of one of the cabinets I am talking about, and here is the picture of our old bath with the cabinet in it.


This time, we were trying to do this without spending any money,or VERRRRY little! I decided to run to The Habitat Re-store and buy an old cabinet door(to save time), then build a cabinet around that door. I found one for $4.00, easy as pie! And Justin, bless his heart designed it around my specifications and built… and rendered it in 3D so we could discuss how it looked. Here are the final renderings, (he even did one with a mirror on the inside of the door).


Cassity Kmetzsch started Remodelaholic after graduating from Utah State University with a degree in Interior Design. Remodelaholic is the place to share her love for knocking out walls, and building everything back up again to not only add function but beauty to her home. Together with her husband Justin, they have remodeled 6 homes and are working on a seventh. She is a mother of four amazing girls. Making a house a home is her favorite hobby.


>I am soooo impressed AND inspired!!! BEAUTIFUL!
Thanks, friend, for linking up to Thrifty Thursday on Tales from Bloggeritaville! Great thrifty treasure!
Leigh
Tales from Bloggeritaville
http://www.lbratina.blogspot.com
>Looks great! Beautiful bathroom. TFS
>Awesome! Looks fabulous! = )
>Looking so wonderful!
>You all have some skills! Great job! I am SO impressed!
>Its beautiful, excellent workmanship. Even my dh mr perfection would admire it. I'm going to show him!
Kathy
>Congratulations on a great bargain finish! You're reminding me that I really need to replace the cabinet in one of our bathrooms.
Thanks for linking up to Finished for Friday! I love the set of links to parties you have in your sidebar – you are just a party animal!
>It Looks great! It is so neat that you made it! Great Job it looks lovely in the bathroom. I am now a follower!
>Great job! Your project addressed the three most important tenets of good design: safety, function, and beauty. Kudos!
>I wandered over from Lit and Laundry's Finish for Friday- this is SO nice! If my husband made that, well, it would NOT look like that. Great job to both of you!
>What a great idea to start with the door! We just bought our house this last summer, and I can already tell that we're going to LOVE going to the Habitat for Humanity re-store in town!
>Whew that looks like a lot of work but the result is very nice.
>$4? Seriously…gorgeous.
>Hello…
So nice to have you join in with the fun of Sunday Favorites…Welcome!!! Wow…I love this post…I love all remodel/make-over projects!!! How creative and industrious you and your honey are…great job on this beautiful bathroom cabinet!!! And…for just $4??? Fabulous!!! I love the arched design at the bottom/underneath side of the cabinet!!!
I also loved the idea of just using a pre-made cabinet…taking those legs off! I would have never thought of doing that! I love blogging…I have been so inspired by all the great ideas here…such as yours! Thank you for sharing your creativity and talents with all of us!!!
Well my friend, so happy that you added Happy To Design to you list of blog follows! I have also added your delightful blog to my list and really do look forward to your upcoming posts! I'm also going to do a little snooping and go back through your past posts! Hehe! So very nice to meet you!
Warmest wishes,
Chari @Happy To Design
>I love the Habitat re-store. Great work on the cabinet.
>That looks awesome! You guys did a great job!!
>I'm LOVING your little cabinet, and I'm LOVING your hubby Jeremy for being so accommodating and HELPING you with this project. Pretty sure my hubby would rather be fishing – – – –
>This piece turned out so well! I love the design and functionality of it. You and your guy make a nice design team! You must swell with pride when you see it hanging in your bathroom.