Upholstered Headboard & Bed Frame
Submitted By Orange Sugar

Since moving into the house we have had our mattress and box spring on the floor. We have a metal bed frame but because of the sloped ceilings it was too tall to use. I love upholstered beds but had no desire to pay retail and after stumbling upon Ana White’s website I no longer need to. She has given us the courage and skills to build a lot of our own furniture.
I used her chunky leg bed frame plan with a few modifications to make an upholstered bed frame inspired by West Elm’s Nailhead Bed Frame.

I wanted the bed to be easy to disassemble and move. For that reason I used corner supports from Home Depot and Bed Rail Fastenersto hold the sides together. I also upholstered each board separately instead of building the box and then upholstering like I have seen some other people do.
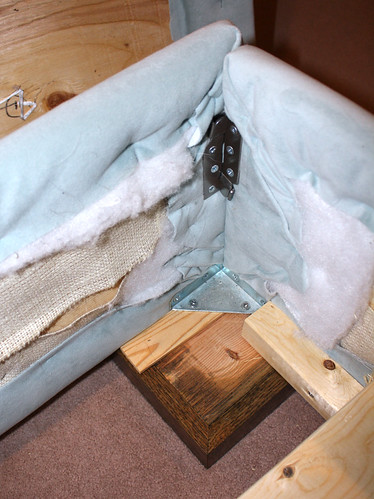
We did not use a center support and slats because we needed room for the box spring. Instead we screwed a 2×2 to the bottom of each side of the bed and used 2×4’s supported in the center to hold the weight of the box spring and mattress.
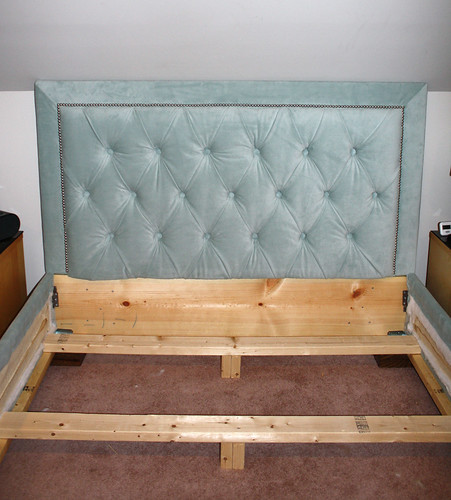
No bed frame is complete without a matching headboard so I had to say goodbye to the oldand create a new one.
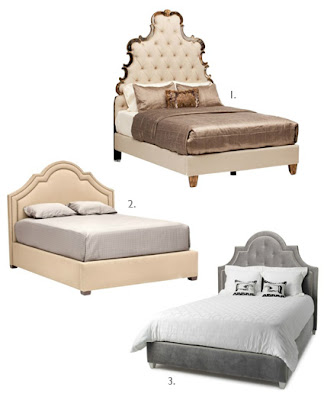
1. Sanctuary Bed, High Fashion Home 2. Madison Bed, High Fashion Home 3. Woodhouse Bed, Jonathan Adler
I love all three of these beds and their arched headboards. Unfortunately none of these shapes would work with our slanted cape ceilings so I had to settle for a rectangle. This was my inspiration.
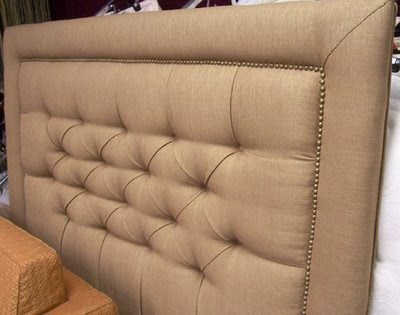
Source: Heller Furniture
I’m not going to create a tutorial because I can point you to other blogs for that, but I will include a few tips and progress pictures. I strongly recommend that you do not attempt this project without an air or electric powered stapler. There is just way too much stapling involved to use a manual one.
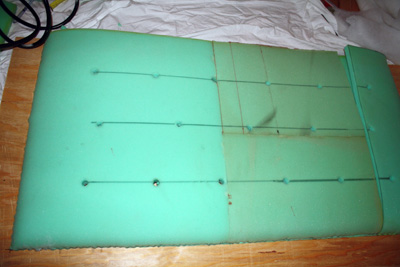
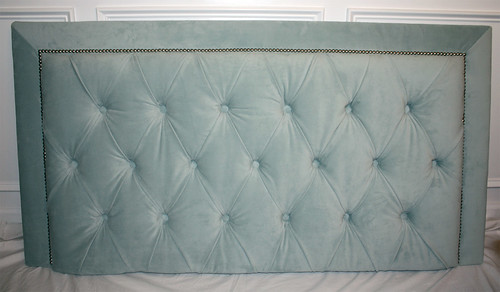
I used 2″ foam and two layers of batting, one high loft the other I just had laying around. You don’t want foam where your nailheads are going to be, so you need to round the foam over for a softer transition. Basically you just staple the edge down along the line of the shape you are making. See this video for a better idea of what I’m talking about.
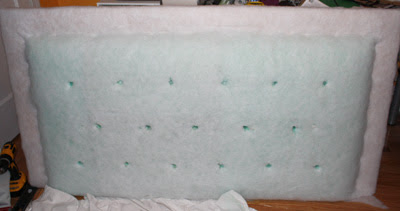
This is a queen size headboard. The border is 4″ wide and my holes are 7 3/4″ apart. Initially we cut out holes that were pretty much the same size as the buttons. Later we had to go back and make them a little larger.
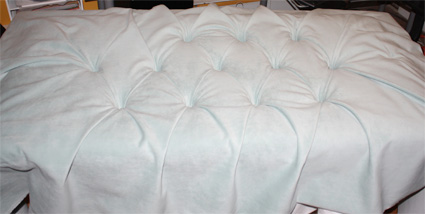 My fabric is a faux suede and on the thick side. Instead of trying to cover my own buttons I took my fabric to an upholstery shop and had 20 buttons made for only $10.
Tutorials used to complete headboard:
GACMKC on youtube – the headboard they end up making is dated, but I picked up a lot of good ideas
Diamond Tufted Headboard at Addicted to Decorating
Diamond Tufted Headboard Part Two and Three at Brick City Love
I am the husband of the amazing Cassity of Remodelaholic. I love to problem solve and to design and build things inside and outside the house to make life better. I am a professional Landscape Architect by trade and love the outdoors.


Our bed doesn’t have a headboard or footboard and it is driving me nuts. I really want to make a headboard but can’t figure how to attach it to the steel frame. It can’t be too high as the bed is in front of a window. Do you know where I can find discounted foam? Thanks for sharing.
Shirley, a lot of people go and buy the mattress pads and Walmart or some other box store. If you need it thicker, just layer a few of the pads! You can get a twin sized pad for about 10.00 bucks! Good luck!
Cassity
Your tufted headboard is beautiful!! I totally agree that when making a headboard that an air powered staple gun is a must. I learned this the hard way!!! Wish someone had of told me!!
Check out rochford supply for foam. 2″ thick is what I use. You can make legs for your headboard with 2×4’s and bolt it onto the bed frame.
GORGEOUS!!!!!!!!! I love it!
Gorgeous!!! I LOVE the bedding too! Where did you find the bedding?
HomeGoods
Great job. We are thinking about doing something like this. Where did you get the legs? What are those? And that headboard is unbelievable!
Where and what kind of fabric is the head board? Also what color? Absolutely love it!!
How did you attach the headboard to the rest of the frame? I can’t tell by the pictures. Thanks!
Sooo glad I found this :), we have the exact same slanted ceilings (funny because it really helps me visualize what ours will look like). I would love to do an upholstered frame but we don’t have alot of storage so we have 4 under the bed containers that are just too useful to get rid of. Great job, looks amazing!
Can you tell me how much it cost you to make this bed??
WOW, AWESOME JOB!! <3
Hi there, the whole thing is going fine here and ofcourse
every one is sharing information, that’s in fact good, keep up writing.
This DIY is exactly what I’ve been looking for. Did you use individual nail head tacks or strips? If you did individual do you have any tips for keeping them so straight? How is the non mortise bed rail fastener holding up?
Hi Michelle! This was a guest post, so if you’ll head over to the guest’s blog (linked at the top of the post) then you can ask there and hopefully they have an answer for you. Thanks!
I love this! Exactly what I was looking for, but I was looking for fabric and was wondering if the fabric had any guidelines like stretch or not? I want to do velvet and there are apparently lots of types and I don’t know what is the best for this project. Please help me!
Hi Erin! Thanks for reading. This was a guest feature, so if you’ll head over to the original blog (linked at the top of the post), then she can help answer your questions. We’d love to see pictures when you’re done! Thanks!
Beautiful !
This is sooo cute! I have twin girls also who almost old enough to switch out of their toddler beds and an older girl who would love a headboard lol. I am soo going to do this and the $$ that I will be saving will convince my husband that it is totally worth it. Thank you for the plans/instructions!!