Easy 3D Paper Ornaments (Paper Christmas Decorations; Day 2)
…. on the 2nd day of Christmas my blog friend gave to me ….


Scalloped Edged Ornament
I think that first one is my favorite so far, and it is probably the easiest one I have made.
Also it is definitely kid friendly.
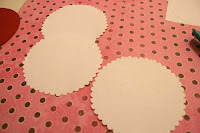

- Start with your choice of paper. I used two coordinating pieces. Or it could be solid or a rainbow of colors… It is up to you!
- Use a circular shape, (a cup for example) and trace that shape onto your paper 8 times.
- Cut out circles. *** Optional, if you have scallop edged scissors or pinking shears use them.
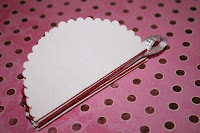
- Fold circles in half, like above


- Glue the side of one folded circle, and glue two pieces together.
- Repeat with all sides until you have a small stack of half circles

-
- Add a small ribbon loop to ornament and then glue final two sides together.

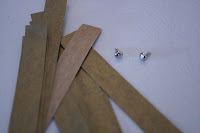
Brad Ornament

-
Cut card stock paper into thin strips about 1/4″-3/8″ inch wide by 6″-8″ inch long
-
Gather strips together, good side facing up
-
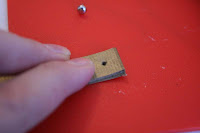
Make a hole in the end of strips. (I used a nail and hammer, with a cutting board underneath)

-
Place brad into hole and secure it (not too tightly)
-
Repeat on second end, but before putting the brad into the paper add some looped ribbon. ( I taped the end of the ribbon so it wouldn’t fray, and pushed the brad through the taped ribbon portion)
-
Now fan out your pieces.
**I learned that you need to use card stock and the thinner and longer the strips of paper
the better it looks, the one below was my first try and it is not my favorite!

Cassity Kmetzsch started Remodelaholic after graduating from Utah State University with a degree in Interior Design. Remodelaholic is the place to share her love for knocking out walls, and building everything back up again to not only add function but beauty to her home. Together with her husband Justin, they have remodeled 6 homes and are working on a seventh. She is a mother of four amazing girls. Making a house a home is her favorite hobby.


>very cool. and easy. I may have to try your ornament with the scalloped edges.
I'll be tuning in for more paper decor ideas.
>nice projects! The pictures on your side bar caught my eye… you are a lucky lady!
gail
Thank you so much for a great tutorial! I made both, using Coca Cola soda pop cans. Cans must be flattened first — utube offers many instruction as to ‘how to’. That said; for the sectioned sphere I used a small juice glass for the circle and in the last step, attached a conventional ornament hanger to it its center. Completed dimension was about a 2″ sphere. Though there are similar ornaments with more folds, it would not have worked out as in each section I wanted the image of their Santa Claus to be more visible and this pattern was perfect. As for the open ball, I cut ten 7/8″wide x 4″ long strips which gave me about the same size of finished scale as the sectioned one. A small hole paper punch was used for the silver brads and which their prongs were slightly trimmed down to accommodate its size and thin silver cording was added as a hanger. -Brenda-