DIY Ombre Painted Hexagon Accent Wall
An accent wall is fantastic way to add new life to a space. Painting is a relatively inexpensive update, and often an an accent wall takes less than a quart of paint, making it a super affordable update! A bold patterned wall really makes a statement, like this ombre hexagon accent wall that our guest today will show you how to tape and paint:

 World Map Mural | Burlap and Denim featured on Remodelaholic
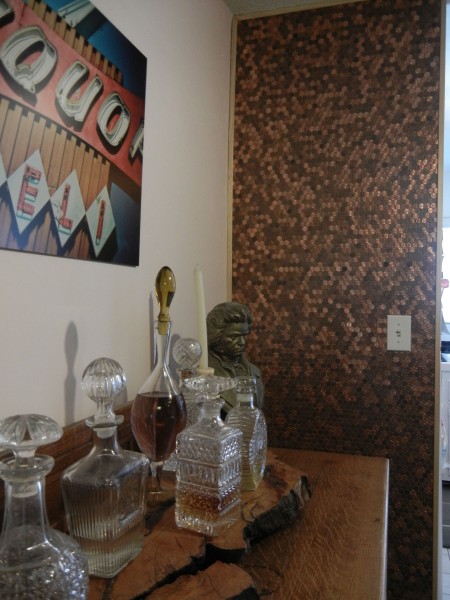 Penny Accent Wall | Hip Soiree featured on Remodelaholic
![]() Painted Chevron Striped Wall + Tutorial | A Commoner’s Castle featured on Remodelaholic
Painted Chevron Striped Wall + Tutorial | A Commoner’s Castle featured on Remodelaholic
Bold geometric patterns, like hexagons and chevrons — and don’t forget herringbone! — are a great way to add inexpensive modern style to your home. If you’re looking for some more patterns to be inspired by, try our round-up of over 100 interior wall painting ideas! And now, here’s Corinna to show you how she designed and painted her hexagon accent wall:
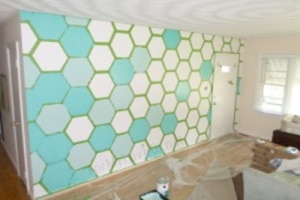
Ombre Hexagon Accent Wall
by Corinna Ashley from For My Love Of
Howdy friends of Remodelaholic! My name is Corinna Ashley. I run a little blog by the name of For My Love Of. I’m here today to share a project I finished over this past summer. My Painted Hexagon Feature Wall.


Honestly, I had not planned on taking on any big painting projects, nor had I been planning on working on the living room at all. But you know how that goes! I inherited a really cool Octagon shaped table. It’s real wood and once belonged to my grandmother so I absolutely adore it! When I had settled on the idea of painting a pattern as a focal point in our living room, I wanted to tie the table into the space. 
I started to map out the pattern on paper, but I realized when doing so that I would also be taping out squares. I didn’t want multiple shapes. Honestly, it seamed easier to go with a pattern that would repeat itself, and itself alone. A fun shape that does that is the Hexagon!

So the idea was born, but I wasn’t sure at first how I was going to execute it. With a little bit of research, I discovered the following- A hexagon has 6 equal sides that are all equal in length. The points of a perfect hexagon fit inside of a perfect circle. The length of each side is the radius of that perfect circle. I loved geometry, so this was easy, but it’s not easy for most. 
I used this knowledge and worked backwards. In [this video], I show how I created a circle by wrapping wire around two writing utensils. One i staked into the cardboard, and the other I drew the circle out with. Then, I staked the sharper utensil into a spot along the edge of the circle, used the other utensil (still wrapped with wire to maintain that equal distance- the circle radius) to mark a line. Moved the sharper utensil to that line, then marked another line. Repeat until all the way around the circle. Connect those marks. You have 6 lines that form a hexagon.

Before stenciling, I (With a lot of help from my little sister) painted the wall a basic bright white. It was originally a beigey-yellow color, and I wanted the hexagon’s outline to be white. If you try this yourself, paint the wall whatever color you want your hexagons to be outlined with.

I took that cardboard hexagon and used a bit of painter’s tape to tape it roughly in the center of my wall. I’m not a very exact person, eyeballing this was enough. Perfectionists may want to measure out the exact center, I promise I can’t tell it’s not perfect though. I did however use a level to make sure my hexagons wouldn’t tilt down the wall as I went. 
With the stencil in place, I used painter’s tape to tape around the first hexagon. Removed the cardboard and placed it next to the first, checked to make sure it was level, and taped around the second. The third one I did above the first, checked to make sure it was level, and taped that one out. Once I had the first three taped out, I only checked that I was still level every 3 or 4 hexs. If I was a little off, I just corrected myself on the one I measured. Hexagons are a forgiving shape. If they’re not all precise, your eyes will fool the rest. I just did my best and am very happy with my precision eyeballing and occasional leveling. 
When I had taped out enough hexagons to where I had the entire wall covered minus the partial hexs around the edges, I cut the cardboard to fit the space at the top. I chose to do this versus the bottom because I figured that if I messed up on the bottom, furniture would hide it anyways. So I taped my stencil up, taped, moved the stencil, taped, repeat, repeat, repeat.

On the sliver to the right of our front door, I worked my way around the top of the door frame. I lucked out and it was the perfect spot in the pattern where all I had to tape off were the tops and bottoms of the hexagons. I wish I had planned that out, but I really just got lucky. 
The fun part was painting. I had leftover paint from my son’s nursery remodel. The color is Stonington Gray by Benjamin Moore. I also had leftover white paint from the first base coat for the wall. My chosen color was Benjamin Moore’s Poolside Blue. It’s the prettiest aqua/teal color ever. Because I wanted an ombre effect to the hexagons, I chose to create my own custom colors with what I had versus buying loads of sample cans, it’s cost effective and prevents me from having to throw out the paint I’ve had lying around. Win-Win. (Each paint I had the Ace store associate mix into one of the Ace brand paints in Satin finish)

I naturally started to the left of the wall. Using a small foam roller, I painted a few random hexs with the poolside blue. I then poured a bit of Stonington Gray into a container with a glob of the Poolside Blue. I used this mixture to paint a few more hexagons. I concentrated the darker paints I mixed up to the left and spread them out sparsely to the center. When I started mixing bright white with the poolside blue, or bright white with poolside blue + Stonington Gray, I gradually moved those diluted colors further and further right along the wall. I threw in a few lightened colors to the left and a few darker colors to the right. I was aiming for subtlety with my ombre, and this technique gave it that subtlety.

While the hexagons dried, I touched up any spots that I slipped up on and collapsed. It was a lot of bending, jumping, reaching, and crouching. The next day I peeled back the painter’s tape to reveal the finished product.

I cannot put the excitement I felt into words. It’s really cool in person and plays well into the 1950’s feel of our home. With the right color choice and hexagon size, I can imagine this working well in homes of all eras.

Cost breakdown: Each can of paint was about $23 x 3, wide painter’s tape $10 x 2, and the roller and foam refills were from the dollar store at $1 each. The total comes out to a rough $100 if you don’t already have some of the supplies around ( I had all but 1 roll of painter’s tape and the poolside blue paint).
If you’re like me, and are wondering what’s up with that giant space to the right of the T.V., I’m searching for the perfect record cabinet to put there. I’ve Olioboard-ed it to show you what it should look like when finished.

If you’ve enjoyed my project, I’d love to have you over on my blog. I’d also be honored if you’d take the time to “like” my facebook page, and follow on twitter, instagram, pinterest, and add me to your google+ circles.
Thanks so much for sharing your awesome wall and great tutorial, Corinna! I love the shades of blue!
Head over to For My Love Of to see more of what Corinna has been doing around her home.
(PS: We found Corinna through our weekly Remodelaholics Anonymous link party, so you should come link up, too… just sayin…)
Lorene has been behind the scenes here at Remodelaholic for more than a decade! She believes that planning projects and actually completing them are two different hobbies, but that doesn't stop her from planning at least a dozen projects at any given time. She spends her free time creating memories with her husband and 5 kids, traveling as far as she can afford, and partaking of books in any form available.


Thank you for allowing me the opportunity to share this project with your readers!
You are welcome! Great project!
I love the Ombre Hexagon Wall!! It’s awesome!!
Thank you Crystal!
Hi! Amazing job! I was wondering if you had any trouble with peeling back the tape the next day.. I’ve been reading about DIY paint projects, and most recommend to peel away the tape while the paint is still wet. Does it have to do with whether you use oil-based or latex-based? (If so, which one did you use?) Thanks!
Hi Kloey!
I honestly couldn’t tell you whether or not it makes a difference if using oil versus latex based paint. I used latex and did not have trouble peeling away the tape. But, I have also read where people recommend peeling while wet because they’ve had problems peeling once dry. Maybe it depends on the finish or the paint? Satin still has some sheen/smoothness to it so it may aid in easier removal. It’s purely a guess.
I wish you luck with your projects! Thanks for viewing my project!
Well Done ! LOVE your ombre hexagon wall – it looks amazing !
Thanks, Cheryl!
So we’re currently doing this in one of my cousins rooms, I have blocked out most of the wall pretty easy, but now for some reason I keep getting a wonky hexagon. I have no idea what happened and I can’t seem to fix it without starting over. Any advice?
I am doing this for our nursery…. in pinks… and from the video it does say there is no way to make it 100% perfect and you have to some what eyeball it.. I have had to do this with one or two of the hexagons to make them line up – I imagine it will result in the border looking a little thicker around one of them – but its she says this is ok and you cant tell – so we are keeping our fingers crossed.
I’m sure it will look great! Send us a picture when you’re done! 🙂 https://www.remodelaholic.com/share-brag-post/
Oh my goodness. This is almost the exact same things I did on my YouTube channel for my daughters room a several years back. I even used a similar turquoise but since I let my daughter pick the colors, it also had pink and purple in there too. I was so sad to see that the links are no longer good for the website since apparently we have similar taste in style.
Yep, this published back in December 2013, about 5 months before you did yours! It is a great project.
PS: I just updated the links to Corinna’s website. She rebranded since then and the redirects weren’t working 🙂 https://www.adesignerathome.com/