Got Laundry? Laundry Room Remodel Continued…

Okay, so this post isn’t really about laundry, it is about our laundry room / pantry.
 
Technically I LOVE my launtry (laundry-pantry hybrid name..) room.  If I were to design it, I am sure it would be a little different, and include room for my freezer, a sink, a sewing nook and a foot ball field scratch that last one, I was getting carried away… but you know what I mean, for the most part it is a great space.
 
In this house I made the decision to have all our food in my pantry and none in the kitchen cabinets.  Since this would fix any rotation issues, you know the ones where you find a can of tomatoes that expired five years ago…  By keeping the food all in one place, I would really know what I have and what I need, easy-peasy!  We had a bunch of great shelves, we added a few more.
 
Well the Laundry side of the room was really lacking when we first moved in, it had one little shelf across the top with a bar and nothing else.  This screamed “I need to be loved” to me. (what it looked like after we removed the shelf)

So, about a  year and a half ago, we started organizing it.  I found some great cabinets at the Habitat Restore. A set of 2 that match our kitchen cabinets and a tall one that doesn’t exactly match door styles, but still looks great, we installed them and that is as far as it went.


I literally shoved junk in them and haven’t looked back.
 
Well, that is until about 3 months ago when I decided to paint the cabinets.  I took off all the doors, had my husband install the crown and slapped one coat of paint on there before moving on to bigger and better projects.

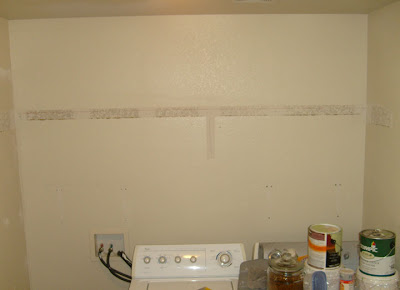
So, now, instead of at least having doors to cover the utter mess, (they were off waiting to be painted ). The chaos that was the inside of my cabinets reined supreme, every time we walked into that space it was like a slap in the face.  Like having a rock in my shoe for the last 3 months, it has been really bothering me, but I’ve just been too busy.

That is until Thursday night, last week.  I was putting Etta down for bed and I have some time to just think.  I realized I actually had the energy and desire (all at the same time WOW!) to actually work on a BIG project, and because of the snow Justin had a long weekend… So, I came down and Justin asked What do you want to do?… (I love you Honey)

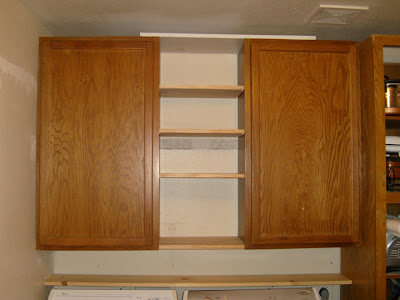
We put on our paint clothes (note to self show you a picture of those…  they are pretty trashed HOT)  We dusted off the paint brushes and started painting…. We are not quite done, but I am actually determined to finish, AND organize the space sometime this decade, and it is looking so good that it is making me want to work.  Here is a little bit of what we accomplished.  Oh and please don’t judge me on the state of the cabinet interiors, floors, shelf organization… I promise, when the room is finished that they will be organized and beautified!  But for now people, it is just a true MESS! to quote the rest of the blog world… here is to keepin’ it real!

First one of the doors was crushed and cracked.  Justin glued and clamped that baby right back together good as new and patched it within an inch of it’s life.  But now, you can’t even tell.  Now that is the power of paint!  We lightly sanded it all, but focused our sanding on where they would be most handled.


The last thing we are doing is adding a little “doggie” door for the litter box.  This will help to hide the ugliness and hopefully coral all the extra litter.  The door is still not totally finished. 


I figured out a little tip while painting my bookshelves from this project, that I thought was share worthy.  You know the little holes that you have for adjustable shelves, pictured below. 
 
 
Well painting them is a total hassle, but you can’t just leave them.  Here is what we did.  (p.s. the cup is our cheap answer to portable paint)  Grab some Q-tips and your paint.


Dip your q tip in the paint, remove and swirl around in the hole, then remove excess.   Do not load it up with paint or the supports may have a hard time fitting back in there.  If you run into this problem you can clean it out by sticking a drill bit of the proper size in the hole and a pulling it out a few times.  In that bottom right picture you can see the difference between the painted hole vrs the unpainted one.  It just looks more uniform.


Here is our set up in the kitchen, which seems to be the painting location of choice.  Maybe I am hoping I will drop a gallon of paint on the tile, so I will be required to replace them.  


The shelves back in place and the first of the cabinet doors.  As you can see the other cabinets are VERY full!  
 
I need to point something out. Justin and I found the two large cabinets (pictured with doors on) at the Habitat Restore for $38.00. Then, on another visit we found the tall unit for $25.00.  We decided to get them both for this space ( the doors don’t match but we may fix that later..  The problem was that the 3 large cabinets were still  not big enough to fill the whole space.  
 
How did we fix that?  Easy, we bought a piece of pine and cut shelves to add between the two large upper cabinets.  We painted the back wall the same color and wrapped it all with crown.  Now it looks like a cohesive unit.  What do you think?
 
Here are the rest of the pictures… Someday I am hoping to get nice pretty front loaders.. but these work so for now I can’t justify the purchase just for the look of it.  
 

The very latest news?  Officially, last night I was struck with a great idea for the pantry shelves, it may take some time yet to finish this project, but it will happen!  Just wait….  More to come later!

Website | + posts

Cassity Kmetzsch started Remodelaholic after graduating from Utah State University with a degree in Interior Design. Remodelaholic is the place to share her love for knocking out walls, and building everything back up again to not only add function but beauty to her home. Together with her husband Justin, they have remodeled 6 homes and are working on a seventh. She is a mother of four amazing girls. Making a house a home is her favorite hobby.

get the reader favorite

Cleaning Binder & Custom Cleaning Calendar

This 18-page editable cleaning binder printable pack will help you establish a cleaning schedule based on the custom tasks you actually need for your home. From the spring cleaning checklist to everyday cleaning recipes, this printable set is great for kick-starting a cleaning routine and staying on task with annual and semi-annual tasks, too.

Similar Posts

Leave a Reply

Your email address will not be published. Required fields are marked *

82 Comments

  1. Hi! Just wanted to let you know that your links in the posts do not work at all , they all come up as page not found.
    Your projects are amazing!

    1. Thanks for letting me know! I just updated them, when we switched over to WordPress, a lot of my links got messed up! We have been working on them VERY Slowly! So thanks for bring these to our attention!