DIY Wooden Barn Door Baby Gate

Build your own DIY barn door baby gate to keep your children and pets safe. This rustic wooden baby gate is a stylish indoor gate that can be used as a half door gate or as a full-height Dutch door baby gate.
For more barn door DIY tutorials, build a sliding barn door console, upgrade an existing door to look like wood barn door, and see our favorite DIY barn doors and hardware.

Our DIY Wooden Barn Door Baby Gate
In our new place, we have two young girls and a set of steep stairs, which is a bit of a safety issue. So, we decided to build our own wooden baby gate for stairs, so they wouldn’t fall and get hurt.
I designed this DIY baby gate to look like a rustic wood barn door (since we love barn doors!), so we get added safety *and* style in our living room with a barn door baby gate!
This indoor gate looks amazing, whether you pair it with the matching Dutch door or build just the half door gate.

And if you have pets, this makes a great DIY pet gate or dog gate, too! Build it for a staircase, hallway, or door to a room where you want to keep your little ones or fur babies from having access.
When I first sketched a plan back in 2011 to show Cassity, she immediately fell in love (like the first time she saw me! ha. ha).
There was nothing else like it that we had seen and we loved the unique look of our original barn door baby gate.
This split barn door baby gate really adds character to the finished room!
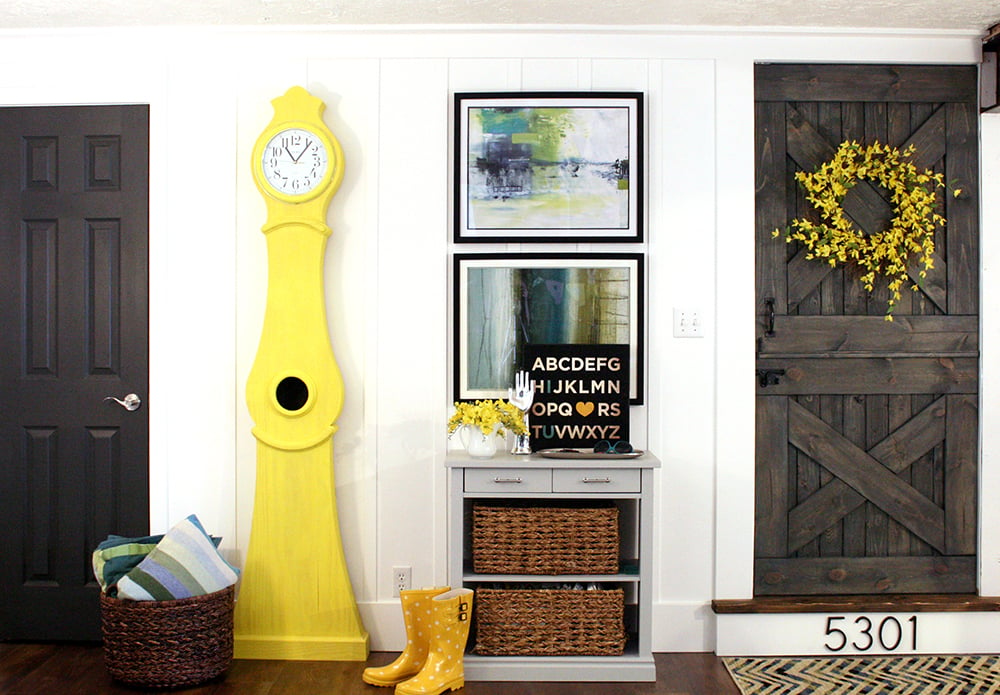
See the full Dutch door here, build the Swedish Mora clock here, install the thin floor-to-ceiling board and batten here, and build the console table here.
Over the years since we first built this half door gate (and Dutch door), we’ve heard that many of you love this DIY baby gate as well.
We love seeing photos, so if you’ve built our rustic barn door baby gate, please send us a photo here or tag #imaremodelaholic on Instagram.
DIY Wooden Barn Door Baby Gate
This is a sponsored post and may contain some affiliate links. However, my opinions are entirely my own and I have not been paid to publish positive comments. Please see our full privacy policy and disclosure here.
Thanks to our partners at True Value, we were able to get all the supplies that we needed for the job. The design of the wooden baby gate plays off of the rustic look.
We wanted it to be like a barn door and have a really rustic feel with some country charm, so read our tips below for the extra steps we used to achieve a more hand-carved look.
Ready to build you own barn door baby gate for stairs? Keep those kiddos safe and have fun building!
Click here to purchase the barn door baby gate woodworking plan.
The printable building plan includes additional instructions for adjusting the size of the gate, and for adding the top to make a full Dutch door, as shown here.

Tools
- table saw (for ripping cap to 2 1/4” — you could use a 1×3 if you don’t have a table saw)
- miter saw (for cutting the lumber to length and the angles)
- drill
- brad nailer (optional, for attaching cap)
- sander (we used the Dremel Multi-Max MM20 to reach the corners)
- utility knife (for shaving edges of pine boards)
- framing square
- tape measure
- pencil
- sander block
- sand paper
- 4” foam brush
- old rag
Materials
To build your own DIY wooden barn door baby gate you’ll need:
- barn door baby gate building plan
- (2) 1x6x96 pine boards (actual width is 5 1/2”)
- (6) 1x4x96 pine lumbers (actual width is 3 1/2”)
- (1) 1×3 pine board (actual width is 2 1/2″) – optional to use for top cap
- (1 box) 1 1/4” drywall screws (I decided to use screws because it pulls the two pieces together nice and tight.)
- Wood glue (optional)
- Wood stain or paint of your choice (I used Minwax water based stain in Charcoal Gray; we later adjusted the stain to match our painted doors by using this colorwashing technique)
- Extra Heavy Gate Hinge (see below for more details about hinge installation)
- Gate latch (the gate latch that I used requires a hole drilled in the door frame)
- Handle (pull)

Our wooden baby gate measures 35 3/4” tall and 35” wide, to fit a 35 1/4” opening.
The woodworking plan includes instructions for adjusting the baby gate size. Be sure to measure your space and take into account the type of hinges and latch you want to use.
The gate hinge and latch hardware that we purchased is hardware that you would use on an exterior gate, but you can use it on an indoor gate as well.

Total material cost was around $60, including the hardware and stain. Your costs will vary depending on the type of wood, hardware, and stain you choose.
Note: Even though the latch we used was quite tight, we added a locking carabiner (a metal loop with a spring-loaded gate) to make the gate latch toddler-proof and extra safe for our kids.
Important Notes About Building a Barn Door Baby Gate
This gate was designed for a 35 1/4” opening. The width of the opening where the gate is needed will determine the width of the gate. Generally you want your gate to be 1/2” to 3/4” less wide than the door opening. This will allow it to swing freely and give room for hinges.
I used 3/4″ thick common pine boards with lots of character for a good rustic look. But you can use any material you like.
After all the pieces were cut the length, I used a utility knife to shave off the factory edge on all corners. This gives the wood a more hand carved look.
After shaving off the edge use a sanding block to soften the edges from any slivers.

For more photos and building tips, see the DIY Wood Dutch Barn Door tutorial.
All screws in this gate were drilled in through the back stiles. This made it look better on the side with the cross x to not show any screws.
For additional support, wood glue can be applied in-between all the wood joints where screws are used.
The angles listed on the cut list are approximate. The printable plan includes instructions for measuring and adjusting the board lengths and angles to customize the wood baby gate to your door or opening.
For full instructions, including a cut list and assembly diagrams, please purchase the barn door baby gate woodworking plan HERE.

Click here for more building plans.
Customized Wooden Baby Gate or Pet Gate
We’ve heard from many readers who have loved this farmhouse rustic baby gate style and customized it to fit their doorway opening and needs. All it takes is a few tweaks of the building plans to have a custom sized wooden pet or baby gate!
See what our readers have shown us they’ve done to resize the gate and adapt it to their specific needs. (And if you’ve built one, please send us a photo here!)
Sliding Baby Gate for Hallway
Reader Brian built a double-wide barn door baby gate to make a wonderful sliding baby gate across a hallway in his home. He says:
“I doubled up everything to make it wide enough to go across my hallway. I added a wheel on each end and a track in between with a wheel upside down on the floor to ride in the track. This keeps the bottom from sliding out and keeps the gate straight while rolling back and forth.”

This makes a great adaptation for a hallway baby gate — wonderful year-round but I bet it’s especially helpful keeping kids and pets away from the Christmas tree!
Bifold Hinged Baby Gate
Jessica from Sew Homegrown had a small stair landing that wouldn’t allow for the full-sized gate to swing open, so she adapted our building plans to a bifold baby gate.


Wide Wooden Baby Gate with Caster Wheel
Reader Kurran built a wide version of the barn door baby gate for their nursery school and added a caster wheel to help support the added weight as it swings.

Tips for Installing an Indoor Wooden Baby Gate
Since every baby gate installation is unique, we’ve collected a few of our best tips from experience, readers, and comments here for your convenience. When installing this barn door baby gate, keep in mind that the strong wood construction makes it heavier than traditional plastic baby gates. You’ll need heavy duty hinges and a firmly secured post, door jamb, etc.
Installing a Half Door Gate in a Door Frame
To install our baby gate in the door frame, we used heavy duty gate hinges in black. We wanted the hinges visible since they match the farmhouse rustic aesthetic, so we installed the hinges on the outside of the door and on the door jamb. Read more installation details HERE in our post about the split Dutch door section of the baby gate.
Installing a Baby Gate with a Metal Stair Banister
Another reader, Chelsey, sent this pic over to show her beautiful rustic baby gate and how they installed it between the wall and a metal banister. Chelsey says:
“We had to get clever with attaching the latch end to a metal banister but I think we executed it well. (We agree 100%! Wow!) And we ended up changing the X into 1 single cross beam. Other than that we kept it the same.”

Installing a Baby Gate without Damaging a Wood Newel Post
Even though this wooden baby gate is beautiful, it’s nice to have the option of removing it later without having to replace or patch a wooden newel post or stair banister, too.
One creative reader shared this simple solution for their adapted gate: using zip ties to attach a matching stained board to the post. The latch is attached the the board, which is zip tied to the banister, and the gate hinge is attached to another board that is screwed into the wall (and the studs) along the stair wall.


Lesley W Graham used a similar approach with the same type of sliding latch as we used:

Additional Tips for Installing a Wooden Baby Gate
No studs to attach the baby gate? We recommend using a couple toggle bolts (also called molly bolts) to secure the board to the wall, to attach the gate.
Looking for a simpler baby gate latch? Jessica from Sew Homegrown used a hook and eye latch, which requires fewer screws in the wall than many latches. And isn’t that turquoise color beautiful!

Ready to build it? Purchase the DIY baby gate plans here.
You’ll also like these building plans:
- DIY Outdoor Baby Gate
- DIY Rustic Wall Storage Bins
- Simple DIY Barn Door Tutorial
- Garden Wedding Arch Arbor
plus check out our entire collection of Farmhouse Furniture and Decor Plans!

I was one of the bloggers selected by True Value to work on the DIY Squad. I have been compensated for the materials needed for my DIY project. However, my opinions are entirely my own and I have not been paid to publish positive comments.
Originally published 09.12.12 // Last updated 10.16.19
I am the husband of the amazing Cassity of Remodelaholic. I love to problem solve and to design and build things inside and outside the house to make life better. I am a professional Landscape Architect by trade and love the outdoors.


Love this idea! Those baby gates are so annoying and ugly. What a great way to beautify something so practical!
Thanks Kat! We are really loving it too!
I was wondering if you had printable step by step instructions for this project? I try to highlight the text and print but it will not show the graphics. Thank you!
Melissa, we don’t have them ready quite yet but we hope to have them up very soon! So we are working on it since we know it doesn’t print very well currently. Check back soon! 🙂
Justin, that looks AMAZING (no wonder she feel in love!) I tried to enter the contest and it says “contest is not open yet” Just thought I’d let you know! Beautiful work and if I still had a baby (youngest is 5) I would be building that gate.
Selina! Thanks for letting me know, I had no idea I messed up on the date! Just fixed it so i hope you will come back and enter!
now that is awesome!!! so much better than the ugly safety first one i had! 🙂
Thanks Cassie! (we have an ugly one too… we just took it out and replaced it, but we’ve been using it for like 3 years!)
What a great idea! Now I just need to have some babies so my husband will make me a gate! 🙂
Devon! It is so good to hear from you! If you guys are hoping to have kids yeah! Do it they are a lot of work but so worth it! Hope you are well, we miss our good old Asheville days!
Good work!
Great idea, brilliant execution!
Thanks Korrie! That means a lot!
Looks great!! What was the approximate total cost?
Thanks for sharing!!!
Around 50 – 60 dollars. We are actually building an upper portion of the door as well, so it becomes a Dutch door, so we spent closer to $100 total. But that includes hardware and stain!
That looks awesome! We’re building a secret playhouse under our stairs and I was planning to put a half door in. Your plans are just what we need!
Awesome, I totally want to see your project when you are all done!
Your baby gate looks awesome and I absolutely love the greyish stain!!!! Would you happen to have a formula or anything you can share? I’d love to know what to ask for at the store to get the same color. Thanks!! 🙂
Melissa, Yes I do, it is Minwax Waterbased Wood Stain. It is tintable (you can see the color options here) I chose Charcoal Grey. I had it Mixed at true Value when I picked up the wood. We applied the stain and wiped off the excess to let the knots show in the pine… I haven’t sealed it in anyway. We want the rustic feel, so no shiny finish necessary!
Thank you Cassity!!!!
Great idea and it looks so nice! I might just have to make one but only wider and for our dogs.:}
WOW! That is by far the coolest baby gate that ever existed! And the free plans are so generous. Amazing project!
This is exactly what I need, not for human babies, but for my four-legged ones! Going to True Value right now to get the supplies, will make it a little taller, as I have large pets, but it will be perfect. Thanks!!
I don’t have babies anymore, but that gate is amazing! Love it.
I love your baby gate design and it’s just what I was looking for to put in the doorway between the kitchen and dining room. Can you explain what kind of hinges or other hardware you used and how to attach this gate to the wall?
I will be explaining that in another post soon. That is a good question though. This situation of ours it a little bit custom and not a typical door frame. Stay tuned for more hopefully next week.
Love this, what a great idea!
Great idea. We might have to do this when our little one becomes mobile. Also, it’s “stiles” not “styles.”
Looks gorgeous!! I just made a similar wood baby gate, although my pattern is a bit simpler and I used distressed wood leftover from our fence that blew over in a tornado. I think these wood baby gates are so much prettier than ugly plastic ones! And they have the added benefit of having a smooth side, so my kittens cannot climb it:
https://house-capades.blogspot.com/2012/08/baby-gate-from-tornado-wood.html
Although perhaps you should also post some sort of warning that kids shouldn’t chew on the stained wood? I was thinking that if I had progeny I would look for a safer stain perhaps?
Very nice! I like how you did yours and using old wood. That’s a good tip on the stain, thanks for your comment.
Thank you so much for this wonderful step by step tutorial! We have a utility entry into the basement and side entry – this would make a perfect dog gate to keep our girl from running off during salt deliveries. My husband is going to want to know what the other (completed) side looks like. Is there any chance of seeing a picture from that perspective? It’s really lovely. Well done!!
I am setting up another post about it soon, that will show that back side finished. I am glad that you liked the tutorial. We are pleased how it turned out for us.
I stumbled on this on pinterest I think its awesome. Really wanting my husband to make one for our pups as we dont have kids yet but I was wondering how it is held in place. Is it really just a half door or completely moveable? Would love to know. Thanks in advance
Jessica, this door is hinged in place with gate hinges on the back side. I wrote about it and have pictures in this post about turning it into a Dutch door. here. Thanks for liking it.
I just built this gate and now I’m scared that the hinges won’t hold it up. This thing weighs a ton!
Did you get smaller hinges, you could always go bigger. But ours have held up perfectly, and they get used A LOT! Tell me how it goes..