Best, Most Complete Wainscoting Tutorial Ever!!
Elizabeth has asked me, her husband, to do a guest blog on the first project in our house.
wainscoting.
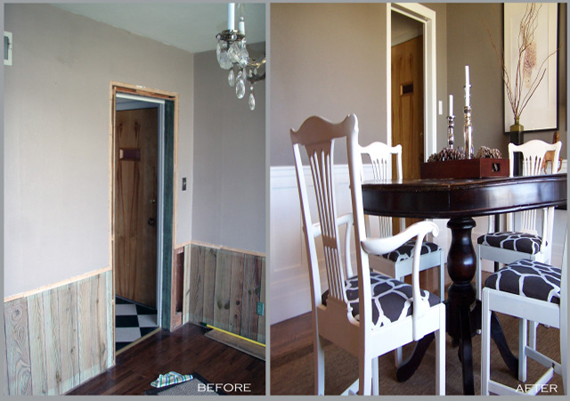
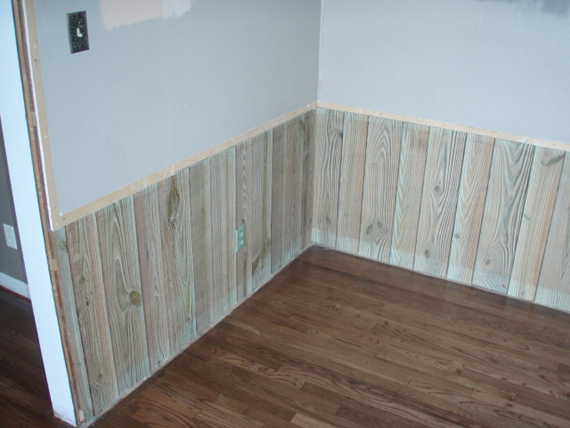
When we moved into our 1954 rancher it was covered in shades of green, walls, ceilings and floors. It was like walking into a giant fungus. The worst part by far was the shag green carpeting, but a close second was the green barnwood wainscoting in the dining room. It had to go. So Elizabeth gave me my tasking and I went to work. It sounded easy enough, and the DIY website said it should take about 1-2 days.

I looked and looked for a magic way to make this work, something to give me dimensions so I could avoid just throwing pieces of wood at the wall, and hope it looked good. There wasn’t, but I did find out that if you base the whole thing on the golden section it should work. The good thing is that most products you buy and use are made using this ratio, everything from picture frames to wine bottles.
The Golden ratio = 5 to 8
I later found out the golden ratio is more than just 5 to 8, there are a few other ratios that work, but I went with 5 to 8.
Part1: Planning out the project
1) Measure length and width of room.
2) Determine ratio that you want to use for height and width. 5 to 8 should work in most homes.
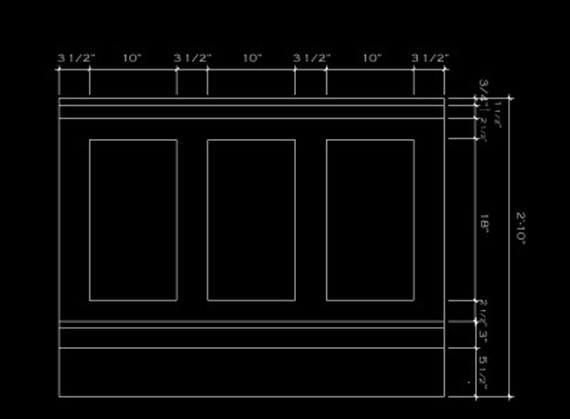
3) Determine number of tiers of depth you want for your wainscoting. We went with 3 because that was what was in the tiny picture.
4)Determine what size divider you will use. We went with a 3 1/2″ wide vertical piece. Any size will work.
5)Measure the depth of the vertical piece.
6) Calculate the panel widths. (Warning: Hardest part) this is where my 1-2 day project turned into so much more. I am a perfectionist and this is a project that I only wanted to do once. You can make the panels different sizes on adjacent walls, but I wanted them all to match. Use the following process to do so. Excel helps. I will give an example afterwards.
Room Width= W
Room Length =L
Vertical Divider Width = V
Vertical Divider Depth = D
Number of panels on width wall = #
a. Pick a number of panels that you want on the width wall.
b. (W-(V+V*#)-(2*D))/#= panel width
This will give you a width for the panel.
c. (L-(D*2)-V)/(Panel Width+V)= Number of panels on length wall.
d. Step C will probably not yield a whole number on the first attempt. You need to cycle through multiple numbers to try and get a whole number. If none of your attempts yield a whole number then select the number of panels on the width wall that is closest to a whole number of panels on the length wall. ie. 9.1 is better then 9.3.
e. The panel width can be calculated using the formula in step B for each wall. Be sure to replace the W with L.
Hard example:
Room Width = 110 inches
Room Length = 160 inches
Vertical Divider Width = 3.5 inches
Vertical Divider depth= .5 inches
a. 4 Panels on the width wall.
b. (W-(V+V*#)-(2*D))/#= (110-(3.5+3.5*4)-(2*.5))/4=22.875″
c. (L-(D*2)-V)/(Panel Width+V)=(160-(.5*2)-3.5)/(22.875+3.5)=5.895(Not a whole number but very close.
d.Step C didn’t yield a whole number. Unfortunately, this is a weird room and nothing does. The closest number of panels is the one we used above. We round to closest integer 6, if the closest number is less ie 2.1 then use 2.
e. (L-(V+V*#)-(2*D))/#=(160-(3.5+3.5*6)-(2*.5))/6=22.416″
If one wall had an odd number of panels then we can make all the panels the same size, and make the odd panel in the center larger or smaller as needed. Example as follows
Room Width = 140 inches
Room Length = 160 inches
Vertical Divider Width = 3.5 inches
Vertical Divider depth= .5 inches
a. 6 Panels on the width wall.
b. (W-(V+V*#)-(2*D))/#= 19.083″
c. (L-(D*2)-V)/(Panel Width+V)=6.885
d.6 Panels on width wall
7 Panels on Length wall.
e. All panel widths = 19.083″
and
Center Panel on Length Wall = 19.083*.885=16.888″
OK Confused? Let us continue. End Hard part.
7) Determine panel Height: divide panel width by 5/8.
Part 2: Materials
8) Now is the fun part. Go to your local hardware store with your dimensions, and select your materials. I say this is the fun part because as you select your materials you get to “build” your wainscoting on the spot. Sort of like Legos. Furniture Grade Pine should work for everything. You will need:
- plywood paneling
- 1/4″ lattice trim as a minimum. The trim is to be used as a backer for other pieces. Select your pieces and “build” your wains-coating on the floor of the store. You look like a crazy person, but its better to find out what it looks like at the store rather than drive all the way home and realize you need another piece.
- primer
- glue ( the caulk gun type)
- sandpaper
- a level
- putty
Part 3: Build
Now you build the wainscoting. The hard part is finished, but now comes the labor. You want to start from the bottom and build up.
9) Remove electrical plugs and air vents.
10) Cut plywood paneling: We had it go from the length of the floor to just below the chair rail, but you only need to make sure that it will cover the area where it will be exposed. Also make sure that you cut holes for the plugs and air vents,and anything else that you will want access to.
11) Prime: I found it easier to prime the pieces of wood before I attached them. This will prevent drips, and you can take a sanding block and smooth out the surface.
12) Apply plywood paneling: Glue the panel on and reinforce with trim nails. A nail gun is extremely handy for this project other wise it will take a lot longer. Try to nail the board onto the wall where you will place other wood pieces later. This will prevent extra work later. Ensure that the paneling is level, using the level. Wait about an hour to let glue dry, but not mandatory.
13) Build Layers: Start attaching your pieces to the paneling. Go from the bottom up, and make sure that you prime and sand before you attach.
14)Build frames: When it comes to the vertical dividers, wait until after the top horizontal pieces are in place and leveled. Use the level to make sure the vertical dividers are vertical. Don’t worry if you need to cut into a vertical divider to make room for a electrical plug,and you don’t need a vertical divider at door frames.
15) Now it is time to remove the blemishes. Use the putty and sanding block to conceal the nail heads, and gaps in the wood. Wait for it to dry.
16) Sand the putty. I recommend a mask, unless you want a white lung, and chalk boogers. A trick to minimize the dust in the rest of the house is to hang a sheet across the doors, and a drop cloth.
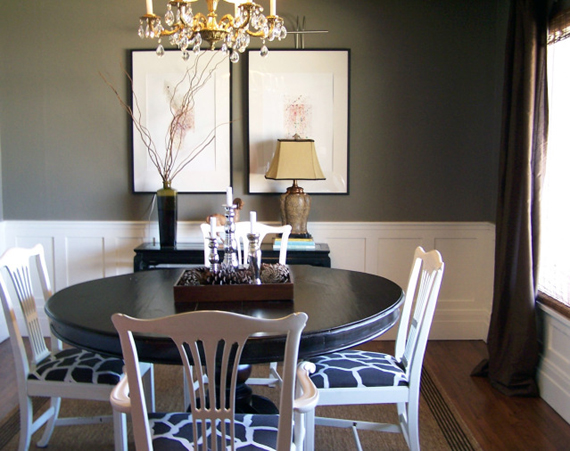
17)Paint: We used a White Oil Based Semi-Gloss. It was a little more expensive, but the result was amazing. The oil based paint has a cleaner, shinier finish than the latex, and prompted us to paint all of the trim in our house with this paint. We used the Benjamin Moore, not the orange or blue store paint. The price was a little more, but the results were worth it. Again use a mask, the VOC’s on the oil based paint are pretty high, and gives you some really really weird dreams if you don’t have a mask.
18) Replace Air registers and electrical plugs, once everything is dry.. If the electrical plugs won’t fit, use an electrical box extender.
19) Clean up and enjoy.


Cassity Kmetzsch started Remodelaholic after graduating from Utah State University with a degree in Interior Design. Remodelaholic is the place to share her love for knocking out walls, and building everything back up again to not only add function but beauty to her home. Together with her husband Justin, they have remodeled 6 homes and are working on a seventh. She is a mother of four amazing girls. Making a house a home is her favorite hobby.


>Your right, great tutorial. Bookmarked!
~Destri
>Great tutorial although now you've got me worried because I did think it was a 1-2 day job as well! Thank you for taking the time to write this.
When you’re figuring out the panels widths… is that math calculation and the “5/8” step two separate ways to do it? Or is the “5/8” part what you do after the whole calculation?
quickest, most economic way to wainscoat your room or rooms; 36×84 or 36×80 prefinished 6 panel oak slab doors. the wider the door, for example , 48×84 fewer the seams. look at raised panel, prefinished, wood of your choice, doors. compare the waincoat, installion cost, time, stain or painting. you will find raised panel doors at a fraction of time and cost is the answer. buy the doors on sale at big box stores and save even more. remember, specify prefinished, smooth or raised panel SLAB doors. best regards, james
Beautiful! Looks like a pro did the install.
Do You have any pics of how it looks under the window?