Kitchen Mini-Makeover with Affordable Tiled DIY Marble Countertops and Aged Copper Light Fixture
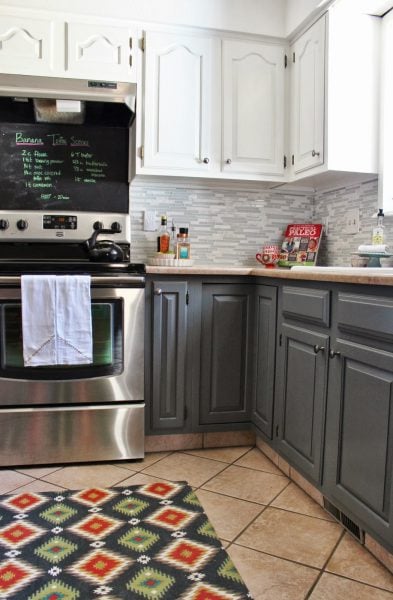
Kitchens are always a favorite space of mine — so many ways to add character and reflect your style in the heart of your home. Our guest today had already made some great updates to her kitchen, but the affordable DIY marble countertops she added (right over the top of her existing laminate counters) and the subway tile backsplash (over the old backsplash) really made the whole kitchen shine:

And her DIY faux copper light doesn’t look too shabby either 😉

Annie is sharing all the details below, and see a few more of our favorite kitchen makeovers — both white and other 😉 — to get you inspired:


Give Annie a warm Remodelaholic welcome!

White Kitchen Mini-Makeover with
Tiled DIY Marble Countertops + Copper Light Fixture
by Annie of zevy joy
Hello my name is Annie and I am from the blog, zevy joy. I enjoy sharing my stories as a stay-at-home mom. I write and photograph about my experiences designing, crafting, dressing and even cooking on a limited budget. The name zevy joy is a portmanteau of my children’s names as they fill my life with joy. You can find some of my favorite projects here, here and here. I love encouraging others to make it work using what they have or finding ways to do it creatively. I hope you leave feeling inspired in this very manner.

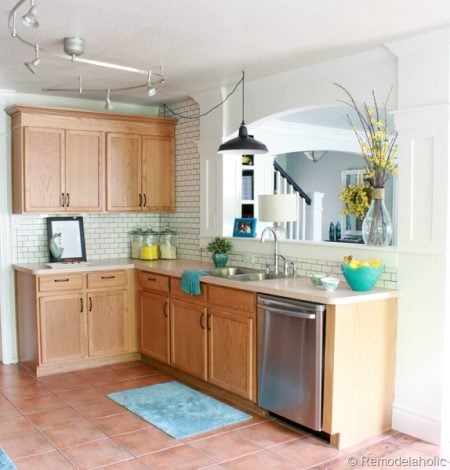
Hello and welcome to our home at zevy joy. Over the years we have slowly been putting abundent love and work into each room here. The latest to recieve the most attention was our kitchen. This kitchen has seen two different remodeling stages. The first being when we moved in. With the help of family and friends, we tore down a small wall, painted cabinets, added cabinet trim, installed new cabinets, put in a travertine backsplash, replaced the laminate floors with hardwood and made an island. It is exhausting just to think about!
BEFORE

We ended up with this lovely space pictured above for the last 8 years. We loved this kitchen, despite how teeny tiny it was it worked well for our family. We made small changes in between renovations one and two, such as new appliances and spray painted fixtures. Since day one of moving in we knew we wanted to replace the countertops, but it slowly became one of those projects that was put on the back burner. Too much time, too much money, etc… etc….
Which brings us to the end of this past summer. Since we had been working on the rest of our home, many of the earthy colored walls had changed to linen white and our style had evolved. Our sweet warm kitchen was ready for a change, but aware of our tight budget and nearly one income family, we had to find a way to do it affordably. We researched many options such as concrete, laminate, paint, tile and more.
We based our decision off of the criteria that we wanted something light, bright, and classic in design since we wanted to live with it for a long time. After lots of pricing and research, large tiles were our best choice for the following reasons:
- Large tiles would resemble slab for a fraction of the price.
- We could install it ourselves with tools we had access to.
- We could do it on top of our existing laminate countertops (there was a concern about removing the countertops ourselves and damaging our perfectly good cabinets).

Here is what you will need to install large tiles on top of laminate countertops…
- Large 12×24 honed carrera marble tiles (or any tile of your choice). The amount will depend on the length and size of your kitchen. We bought twice as much tile as needed so that we could make colors and patterns most pleasing when laid out. Check with your supplier to verify that you can return what pieces you will not be using. We purchased our Honed Carrera 12 inch x 24 inch tile from Tile For Less.
- Mortar designed for large tile. Make sure that it is white because of the pourous nature of marble and color could potentially show through. We used this.
- Mixing paddle for drill
- Wet tile saw
- Tile Sanding Stone (for filing down cut edges)
- Notched Trowel
- Non-Sanded Grout (splurge and buy the more expensive stuff from a reputable tile store rather than the cheap generic brand from major home improvement stores — we used this)
- Rubber float
- Buckets
- Clean Water
- Towels
- Sponge
- Cheese Cloth
- Tile Sealer
- Safety gear (eye protection, masks, gloves, etc.)
To apply large tiles over previous existing laminate counter tops you will…

Measure and cut each tile. Lay out your pattern and spacing ahead of time to make sure it will fit and you are happy with the pattern. As a result of our countertop’s size, we needed to get creative with the layout and ran slender pieces along the edges. The seam is visible from the top, instead of the front. You will need to file your edge pieces around each side using the sanding stone before they are applied.

Follow instructions from the manufacturer and mix your mortar. Using your trowel apply the mortar and begin laying your tile. Spacers were not needed for these tiles because they had angled edges that allowed for 1/16 inch spacing. At the end of tile application we used painters tape to hold the edge pieces in place as they firmed and dried. Important: make sure you work fast enough to use mortar that is properly hydrated and not dried out – particularly on the edges! Dry mortar will result in a weak bond and the tiles may easily dislodge.
Make sure to follow specified wait times (typically 24-48 hours) before grouting. Apply one to two coats of sealer so that it will protect the tiles during the grout process (again, allowing for proper wait time). Alternatively, sealer may be applied to the tile before setting them in the first place.

Once dry, mix and apply grout with a rubber float. As a side note, try your best to match up your grout to your tiles. We went with a smoke gray (different choices we considered are pictured above).
Allow the grout to dry and then seal your final project.
For an island….
This island of ours is a whole different story. We have made some mistakes with application along the way and also had some structural issues. This was NOT the case with our countertops which have held up wonderfully. We originally tried to apply the same process listed above on top of our butcher block island. This was a mistake because the wood absorbed the moisture and cupped. It cracked our grout and needed to be reapplied. We carefully removed each tile, re-prepped and started the process all over again.

The second time around we used plywood for the base, cement board as the surface and then repeated the tiling process. This worked out perfectly until about a week after application. We noticed a very fine hairline crack at the edge of our island. We are confident that this is another issue we can troubleshoot. We believe that even after putting supports under the island we needed stronger ones. The weight of our long overhang (which you can see in the pictures) seems to have caused a slight bow which was enough to create a hairline crack across the opposite end. Moving forward, we have purchased heavy duty supports and will take the three damaged tiles off , with hopes that replacing them will yield a permanent solution. Which brings me to my next point and some very important things to remember: supports and weight. If considering this project, please make sure to check that your surfaces are level and weight bearing. These marble tiles are very heavy and they will add significant weight to whatever surface you are applying them.
Subway Tile Backsplash over Existing Tile Backsplash
Here is what used for our tile backsplash (which was put right on top of our old tile backsplash)
- 3 x 5 Porcelain Subway Tiles in Bright White
- Thinset
- Tile-cutter
- Notched Trowel
- Non-Sanded Grout
- Paddle Mixer for your electric drill
- Rubber float
- High grit sandpaper (may be needed to rough up existing tile)
- Buckets
- Clean Water
- Towels
- Sponge
- Cheese Cloth
- Safety gear (protective eye gear, masks, gloves, etc.)
To apply the tile backsplash over the existing tile, you will need to…

- Administer a very rough sanding to the existing travertine tile to ensure it would adhere.
- Mix thinset according to manufacture’s instructions and begin adhering each tile from the bottom up in a running bond pattern. These specific tiles we were self spacing at 1/16 of an inch which made spacers unnecessary.
- Wait the adequete amount of time required for thinset to set (should be specified on the box instructions).
- Now mix your non-sanded grout using the paddle.
- Use your float to apply the grout and again, carefully follow the instructions to insure appropriate application and dry times.
Here is the basic run down for project costs and time…
- The backsplash including tiles, thinset and grout cost around $100. When you buy individual tiles it is less expensive than those that are sold as sheets.
- The marble tiles, mortar, grout and sealer cost around $500.
- Tools and miscellaneous materials did not factor into our cost because we were fortunate to have access to my Father-in-Law’s tools (who also so generously gave his time to help with this project).
- Due to some mistakes, this project did necessitate some extra cost and time (which should be factored into every DIY).
- We spread this renovation over a period of nearly five weekends (including fixes due to unforeseen issues). If this were done without the issues we encountered, I would assume that the job could be done in approximately seven – ten days (with drying times of 24 – 48 hours for each application of mortar, thinset trout and sealer).

DIY Faux Copper Light Fixture
We also spray painted the builder grade light fixture above our island.


Here is what you will need and the simple directions to do this yourself…
- Two varieties of copper spray paint. I used a matte and a glossy version. One can of white glossy spray paint. One can of Oil Rubbed Bronze Spray paint for the base of the fixture. Fine grit sandpaper, safety gear (protective eyewear, masks, gloves, etc.)
- Put out carboard to protect the surface you are spraying outside. Start by spraying the inside of your fixtures with the bright white and allow to dry. Spray a second coat.
- Once totally dry, turn your fixtures over and spray paint the tops with the glossy copper. Do a couple coats.
- Next, spray with the matted copper and before it completely dries carefully sand it in vertical motions to create texture and aging. Do another coat and repeat sanding.
- Lastly, hang and spray paint the base of your fixture using oil rubbed bronze. Another couple coats will be necessary.


If asked if I would recommend this project to someone else, the answer is yes! We love our new kitchen and how it flows with the rest of our home. There were some unforseen challenges and it was exhausting at times throughout the process, but we learned a lot. There is such a satisfication when completing projects in our home. Without DIY we would not be able to have some of these upgrades and we are so grateful for the opportunity.


I appreciate you stopping by to read more about our process and I certainly hope this helps if you are trying to find a way to make upgrades within limitations. I encourage you to get creative and embrace the unique design that doing it yourself can bring to your home. A big “thank you” goes out to my dad and father-in-law for their design advice and physcial assistance during this huge project!
Sources and Paint Colors
Wall Paint Color – Linen by Clark and Kensington at Ace Hardware
Cabinet Color – Navajo White
Marble – Honed Carerra Marble
Copper Tray – Painted Fox Treasures
Dish Towels – Home Goods
Sink – Ikea Domsjo
Faucet – Ikea – no longer available

Annie, your kitchen and your home are beautiful! Thank you so much for visiting us today to share!
Remodelaholics — be sure to visit and follow Annie over at Zevy Joy to see more of her beautiful home, including this smart guest bed lounge sofa solution:

and if it’s possible… the kitchen is even prettier decorated for Christmas! See Annie’s holiday home tour here.

Lorene has been behind the scenes here at Remodelaholic for more than a decade! She believes that planning projects and actually completing them are two different hobbies, but that doesn't stop her from planning at least a dozen projects at any given time. She spends her free time creating memories with her husband and 5 kids, traveling as far as she can afford, and partaking of books in any form available.


Hi Annie– I love your beautiful white subway tile and marble kitchen makeover! We are planning a remodel next summer and I noticed that you have the Ikea Domsjo sink. I love it but am worried that it will be too small (although I have a very small kitchen). Are you able to soak pots and pans in it and still rinse off dishes if needed? Does it scratch/mark easily? I’ve heard varying opinions about porcelain sinks. Overall, do you wish you had a bigger sink? Thanks for sharing your thoughts!
Hi Amy and thank you so much! Yes it is smaller in size, but it is bigger than the one we replaced it with – so I have felt it has been an upgrade. I would say you can soak small pots and pans and then rinse dishes. Our kitchen is also really small so we couldn’t easily fit anything bigger and for all those reasons, I highly recommend it! It has had a couple scratches from larger pots, although I used a little Bar Keeper’s Friend on it and it shined it right up. So to answer your question, no I do not wish for a bigger sink at this time (considering the size of our counters, kitchen and what we started with). Great questions and I hope that this helped answer some of them!
Thank you so much for this feature Remodelaholic! I am honored to have our kitchen shared here and truly appreciate it!
We love your kitchen, Annie! Thank you for sharing with us!!
I love your kitchen!! I was wondering how you did the edges while using marble tile? Would you mind sharing?
Hi Haley – thank you! We just cut long pieces with our tile cutter from the large tiles and then filed the edges down. We adhered them the same way as the counter tops. Hope that answered your question.
Hi Annie,
I clicked on here to see that beautiful marble counter top you made and wow! well done to you but I found so many more ideas here!!! Thank you so much.I love the copper light fixture. It looks like something you went out and shopped for for ages and finally splurged out on. I like that kinda project..
Thanks for sharing, new follower here:-)
Marie
Your new kitchen is an inspiration! Love the idea of tiling over tile. Please explain how you were able to keep the electrical outlets flush with the new tile. Thank you
What type of prep did you do to your laminate countertop before applying the marble tile
Hi, I love what you have done with the marble tiles. Did you have to prep the laminate in any way before applying your mortar.
Regards
Rob .Yorkshire England
Your makeover is beautiful!
Might I ask how the marble tile and grout are holding up? I am trying to decide between marble tile and large ceramic tile.
Thank you!
Hi Annie: your kitchen remodelation is beautiful. It has been almost 3 year that you have done your countertops.
I love the idea to use the carrera tile, but It is not clear to me how you treat the edges of the countertops? I will appreciate it if you answer my question.
Just beautiful! Love everything you did. Thanks for sharing!????????♀️
I am trying to decide between marble tile and large ceramic tile. Love everything you did. Thanks for sharing with us.
Hello,
Your kitchen looks amazing. I’m doing something similar and I’m wondering how much overhang did your countertop had for the cabinets?
Thank you in advance
Please make sure you tell your audience to be extra careful with marble on the counters. As a designer and installer using marble on counters is lovely but they etch. Lemon, limes, citrus, tomatoes and wine will leave marks on marble because it it’s porous and it is soft. Cutting boards, instant clean up and sealing are 100% necessary. Plus cooking grease can darken marble. That is why white granites and quartzite are so popular along with manufactured quartz and even porcelain slab counters that mimic marble. We use marble in lower traffic areas. However, marble tile is an excellent way to cut costs. I know this counter has been in 7 years now. So what does it look like now?